How we built a Background Job Processor from scratch
This is the story of how three Software Engineers decided to shed some light on Background Job Processors by building one from scratch.
We started by developing a deeper understanding about the use for a Background Job Processor (BJP), then we identified the most popular ones in the Ruby-ecosystem and, finally, we built one from scratch.
In this story we will walk you through the process of how we managed to build a BJP from scratch, Workerholic, that compares to Sidekiq in terms of performance.
We started by acquiring a deeper understanding about why would one use a Background Job Processor (BJP).
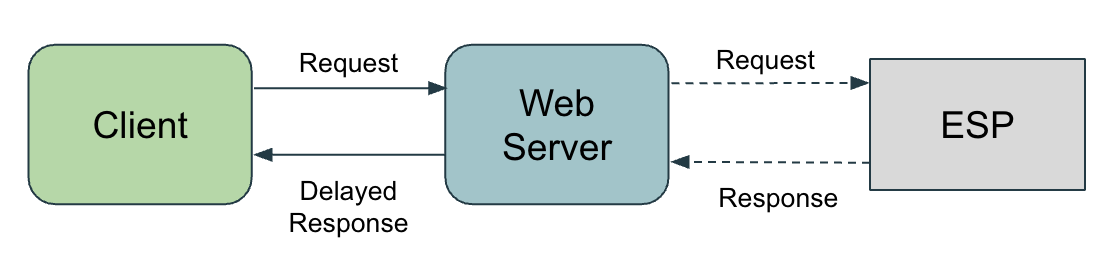
To this end we decided to illustrate the basic use of a BJP with an example: a user, identified as the Client, wants to register on a web site awesome-website.com. When users register on awesome-website.com they receive an email in order for them to verify their email address. What does this mean on the Web Server side?
In the case of awesome-website.com, sending an email requires to send an HTTP request to an Email Service Provider (ESP) and wait for a response, depending on the latency of the ESP and the geographical distance between the Web Server and the ESP’s server this could take from 2ms to 500ms or more. Let’s assume the worst and consider each trip over the wire to the ESP takes 500ms. This means that if the Web Server’s usual response time for this kind of HTTP request is 150ms then it will take 650ms total to send a response back to the client.
650 ms could be considered a slow response time, but it is not unacceptable. What happens if the ESP sees its latency increase by a 5 seconds because of a network error or a an unexpected spike in traffic? The client would have to wait 5.65 seconds in order to receive a response. How can we do better? Does the user really need to receive a response to be able to interact with the rest of the website only after the acknowledgment that the email has been successfully sent? The answer is no, which means we could send the email asynchronously and, in the meantime, let the user interact with the website. This is where a Background Job Processor comes in. Its sole purpose is to asynchronously perform work for the web server and release it from doing blocking work.
Background Job Features Overview
Before we get into how we built a Background Job Processor, let’s look at an overview of the features a BJP should have:
Core Features:
asynchrony: a BJP should handle a task in a different process than the one used for the main application, so that the main application is free to continue handling more requests
reliability: a BJP should be able to handle errors gracefully and be resilient in case of a crash
efficiency: a BJP should perform the jobs that it is handed in a timely manner so that it does not get a constantly increasing backlog of jobs
scalability: a BJP should scale in the context of a distributed system
reporting: a BJP should track statistics about jobs, errors and other related information so the user can make better decisions about its background job system
Additional Features:
configurability: a BJP should be configurable in order to allow its users to configure the available options to best fit their own application’s requirements
ease of use: a BJP should be simple to use out-of-the-box and, if written in Ruby, integrate with Rails
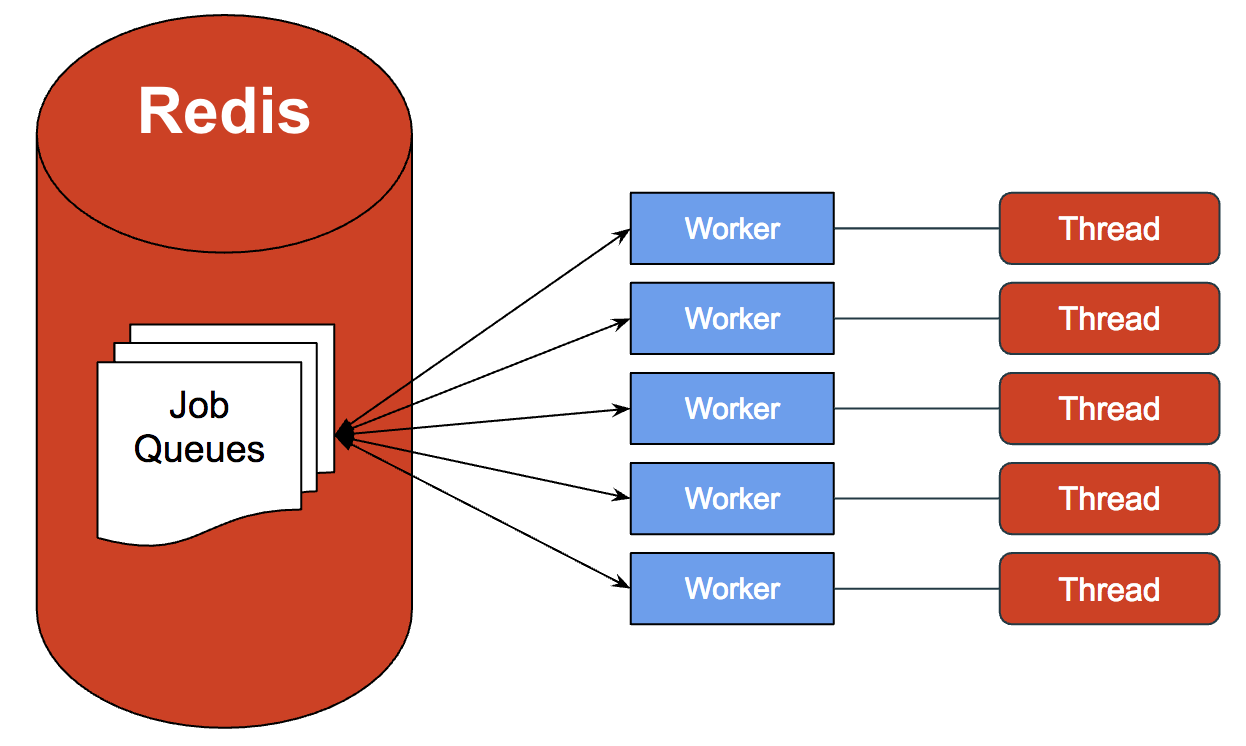
Introducing Workerholic: Overall Architecture
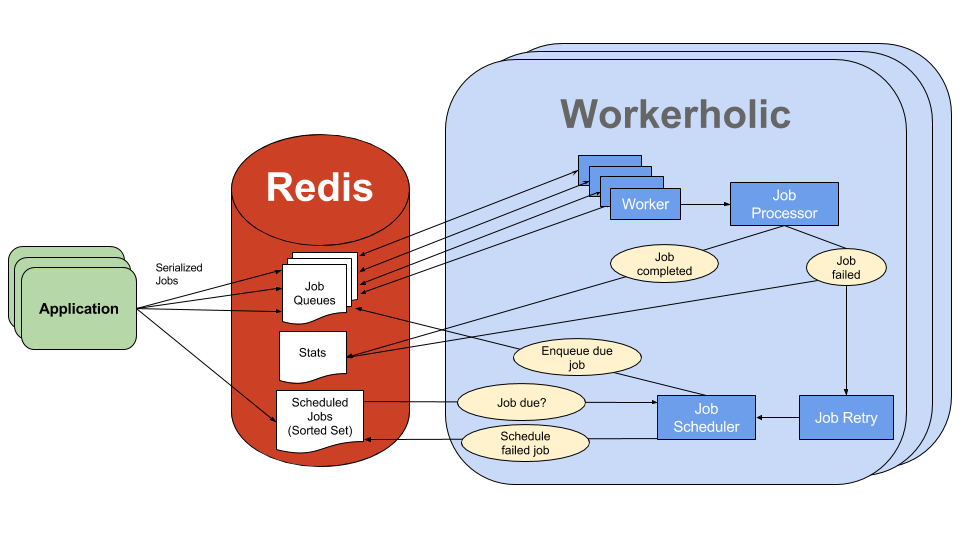
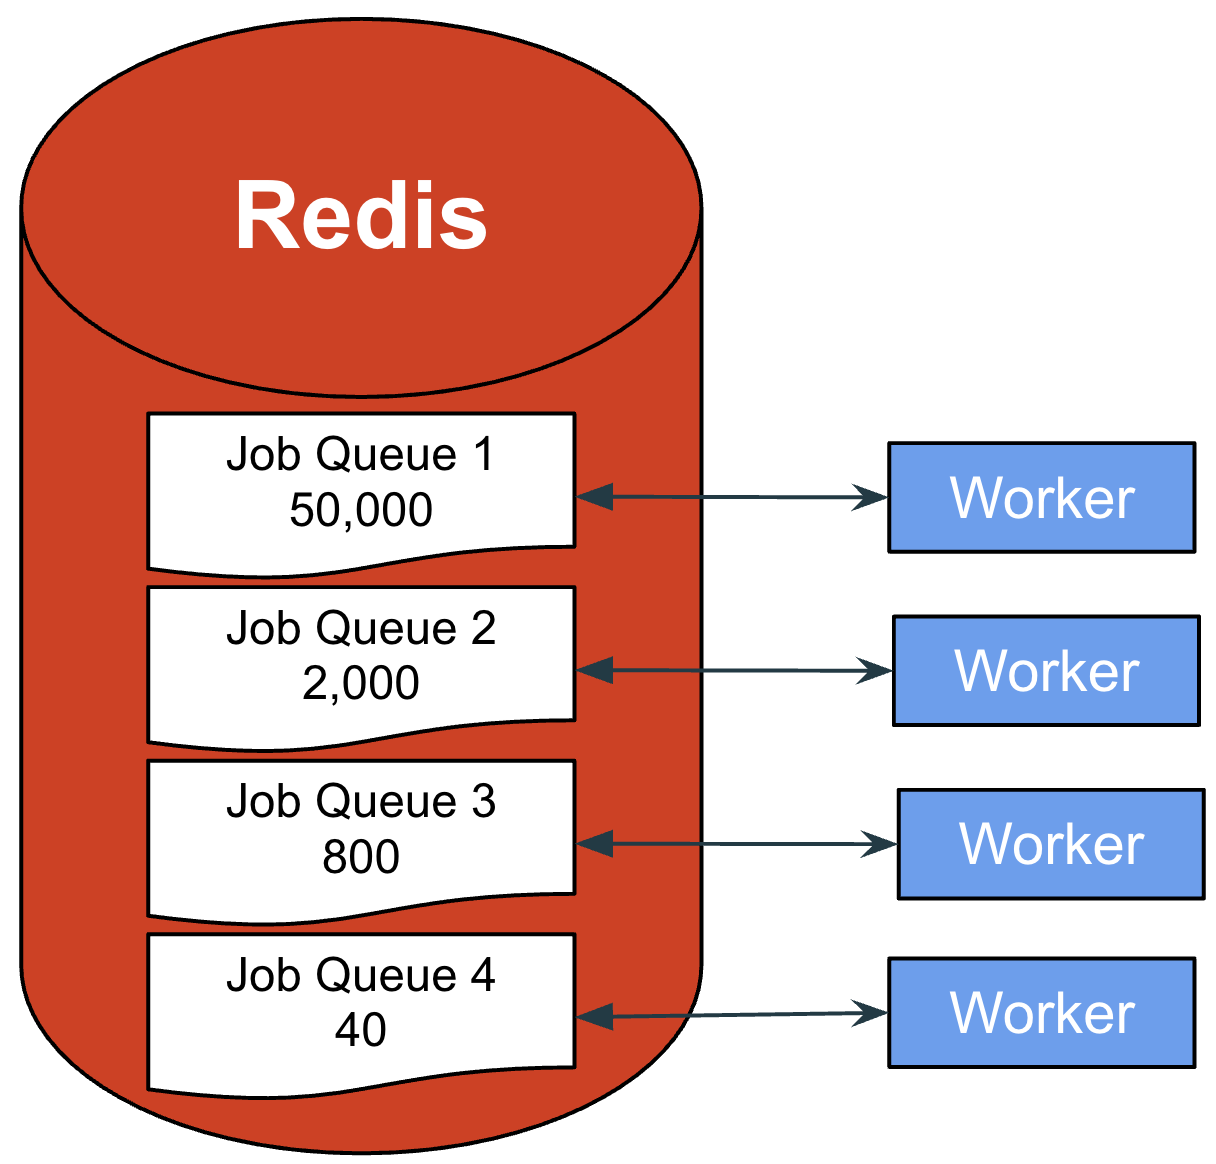
Above is a diagram of the overall architecture of our BJP, Workerholic.
On the left is a stack of instances of a web application, each including Workerholic. Jobs are defined and enqueued in these web application instances.
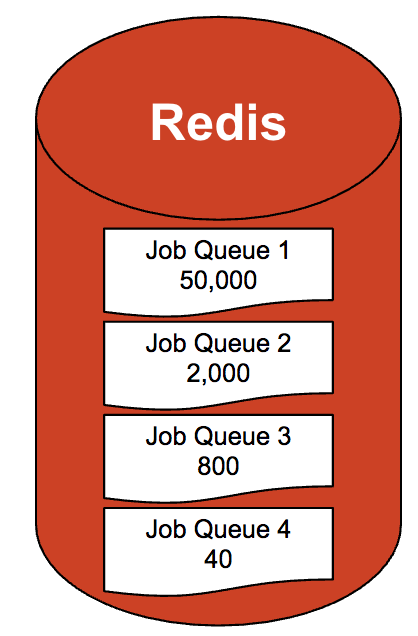
In order for the jobs to be enqueued, they are first serialized and then stored in Redis, by being pushed inside Redis’ List data structure, serving as Job Queues.
On the right, Workerholic workers poll from the job queues and, if there are any jobs to be done, process the jobs using the Job Processor component of Workerholic.
Regardless of whether the job is completed successfully or not, we store the job back in Redis inside a data structure serving as Stats storage. We will then use this statistical information to display background jobs related metrics on our web UI.
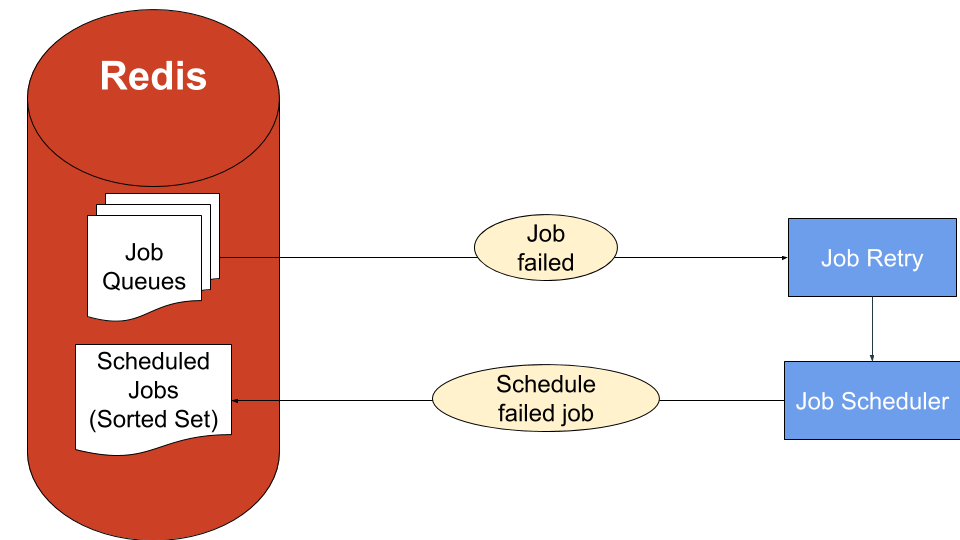
If a job failed, we use the Job Retry component along with the Job Scheduler component in order to attempt to retry a job sometime in the future. To do so, a future timestamp is placed on the job, it is then stored into Redis inside a Scheduled Jobs sorted set (a Redis data structure that we will expand on later in this post).
The Job Scheduler will check the first element in the sorted set and compare timestamps to see if there is a job due. If that’s the case, the job will be enqueued into a Job Queue and the cycle continues.
Building Workerholic
The idea behind this project was to build a BJP from scratch and share the following with the community:
our findings
the decisions we made and why
the challenges we faced
what we learned
Reliability
One of the most important features of any background job processor is reliability. When performing a job, a network issue that prevents email from being sent could occur, or the job could be misconfigured, or the main application and/or the BJP could crash. Regardless of the reason, we want to make sure that jobs are not lost.
How can we make our BJP reliable?
Jobs Persistence
To solve this problem we introduced a data store. This data store is used to persist the serialized jobs that have been enqueued by the main application.
For Workerholic, we decided to use Redis thanks to the following features:
convenient data structures for the problems we needed to solve (lists, sorted sets, hashes)
persistence to disk (every 5 minutes by default, configurable)
key:value data store, that provides convenient and easy to use API to access the data
in-memory data store with high performance for schema-less data (our use-case)
By relying on Redis and its robustness we managed to make Workerholic more reliable. Redis helps solve the problem of when either the web application or BJP itself crashes, the jobs stored in Redis will be persisted. Redis automatically takes database snapshots, which means in case it crashes, we will also have the jobs persisted to disk.
This solves the problem of the main application’s or BJP’s unexpected shutdown/crash. What should be done if the jobs themselves crash/raise an exception?
Retrying Failed Jobs & Job Scheduler
Jobs can fail for numerous reasons that may or may not be in the developer’s control such as temporary network issues, timeouts, invalid job, etc. Regardless of the reason, the BJP needs to handle these errors. In case the error being raised is a momentary error, then it might be a good idea to retry the job later.
Workerholic will attempt to retry intermittently failing jobs. We implemented the JobRetry feature by scheduling the job to be performed at some time in the future, effectively turning a failed job into a scheduled job. Here is the implementation of Workerholic’s retry functionality:
Jobs are wrapped with Ruby objects which have an attribute called retry_count. As the name suggests, it is used to keep track of how many times a job has been retried. A job will be retried up to five times. At that point, it’s more likely that there’s a problem with the job itself rather than something being wrong with an external component, in which case, Workerholic will log that the job has failed and store statistics data into Redis so that Workerholic’s users can figure out what went wrong.
The code snippet above also shows that JobRetry enlists the help of JobScheduler to schedule a time for a failed job to be executed at, effectively turning it into a scheduled job. Here is how JobScheduler schedules jobs and enqueues jobs ready to be executed:
When Workerholic first boots up, its Manager component is in charge of starting a new JobScheduler thread which continuously calls enqueue_due_jobs, every two seconds. In enqueue_due_jobs, a call to a private method job_due? checks if there are any jobs due. If there is, JobScheduler takes a peek at the scheduled jobs sorted set, deserializes the job, puts it in the correct queue, and removes that job from the sorted set.
With this feature, if a job fails it will be retried, following a specific retry logic. But there is still a scenario in which jobs could be lost. What should be done if the BJP is stopped while some jobs were being executed?
Graceful Shutdown
When shutting down the BJP some jobs might still be executing and not yet completed. These jobs would no longer be stored in Redis and would, consequently, be lost upon Workerholic shutting down. The way Workerholic handles this specific reliability issue is by performing a graceful shutdown:
moduleWorkerholicclassManager# ...defstartworker_balancer.startworkers.each(&:work)scheduler.startsleeprescueSystemExit,Interruptlogger.info("Workerholic's process #{Process.pid} is gracefully\
shutting down, letting workers finish their current jobs...")shutdownexitend# ...defshutdownworkers.each(&:kill)worker_balancer.killscheduler.killStarter.kill_memory_tracker_threadworkers.each(&:join)scheduler.joinend# ...endend
When Workerholic detects an Interrupt or a SystemExit, it calls shutdown, which in turns kills its workers and other internal components. The way a worker is killed is by turning its alive status to false:
This will allow the worker to finish executing its current job. Afterwards, we join each of our worker with our main thread of execution. We will touch on why this is important in a later section, for now it is only useful to know that the workers will be waited on before Workerholic exits.
Efficiency
Efficiency is another core feature for a BJP. Why does a BJP need to be efficient? How can we make it efficient? Those are the questions that we will answer in the following sections.
An Example Scenario
Scenario
Suppose we have a significantly big Rails application with the following constraints:
1000 average queries per second (QPS)
10% of these queries involve sending email
1% of these queries involve image processing
Let’s also assume we have a machine with the following specs:
4GB RAM
4 CPU cores
Challenge
How can we build a BJP that will maximize the use of the available hardware resources?
Concurrency
Email Jobs calculations
First of all, we need to do a bit of calculations in order to understand the problem we face in this particular scenario:
Let’s assume it would take an average of 50ms for a trip over the wire (sending a request and receiving a response) to the Email Service Provider of the Rails application.
For a 24 hour window (86,400 seconds) and 1000 QPS, we will get 86.4 million requests per day.
10% of these requests involve sending an email. This means sending 8.64 million emails in a 24 hour window.
If sending an email takes an average of 50ms, then, in a span of 24 hours, it would take 120 hours to send all the emails, which would give us an enqueuing:processing ratio of 1:5. In other words, in 24 hours time there can only be 8.64M / 5 = 1.73M out of 8.64M jobs that can be performed.
This insight raises two issues:
Increased latency: every 24 hours, there are 8.64 millions emails that need to be sent. This would take 120 hours (5 days) to complete. Consequently, any job enqueued after the first 24 hours won’t be executed until the next 96 hours (120 - 24) have passed, effectively increasing the latency by 96 hours per day.
Storage limit:
In the context of Workerholic a serialized job takes about 26 bytes of memory in Redis. We calculated this number by pushing 100,000 jobs into a job queue, getting the total size of the list in bytes (serializedlength) and dividing it by 100,000.
Each day, we have a backlog of 8.64M - 8.64M / 5 = 6.91M email sending jobs that still need to be processed.
These jobs would take 6.91M * 26B = 171.34 MB of memory in order to be stored in Redis. At this rate, our jobs storage space would be reaching the storage limit after 24 (4096 / 171.34) days.
With our current naive approach we have the latency increasing at a rate of 96 hours per day, along with the jobs storage space increasing at a rate of 171.34 MB per day. This would make for a very inefficient background job system.
The challenge for us here is to balance out the enqueuing throughput and the dequeuing throughput. Slowing down the enqueuing side is not a viable option because the web application would become unresponsive, waiting for jobs to be enqueued before moving on, so let’s focus on increasing the processing throughput.
Concurrency & Threads
Based on our scenario, we need to maximize the job processing throughput by a factor of 5. How can this be achieved?
Currently, we have one worker processing the jobs one by one, sequentially. Our goal is to process these jobs 5 times as fast, hence, we need five workers instead of one, working together so they can process five jobs, instead of one, in 50 ms. This is where the concept of Concurrency comes in.
Concurrency is employed to design atomic units of work that can be executed independently from one another, effectively enabling them to potentially be executed at the same time (in parallel or not). In our case, a unit of work is a job.
In Ruby we can enable Concurrency by using Threads. A Ruby program always has a main thread of execution in which the code is executed. It is possible for this main thread to use the Thread API, provided by the Ruby core library, in order to spawn new threads of execution. A thread of execution runs independently from other threads.
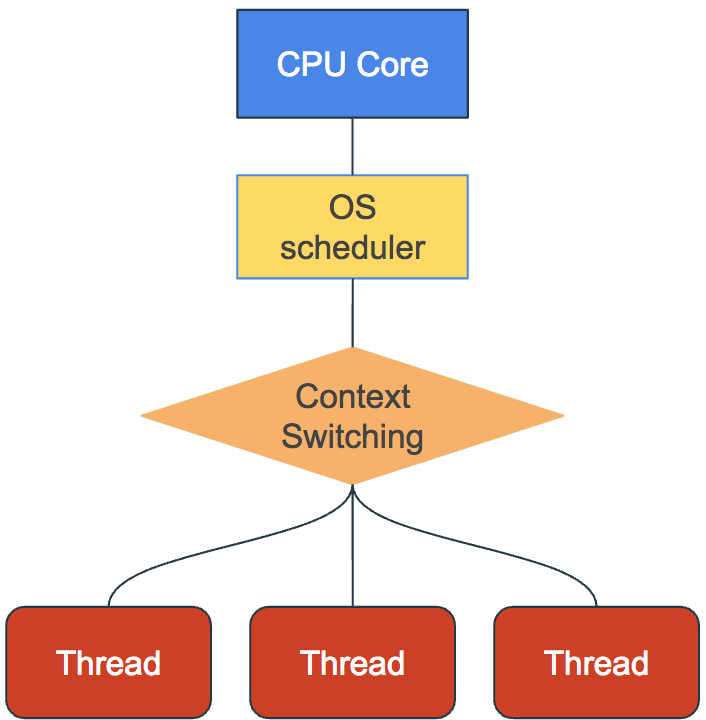
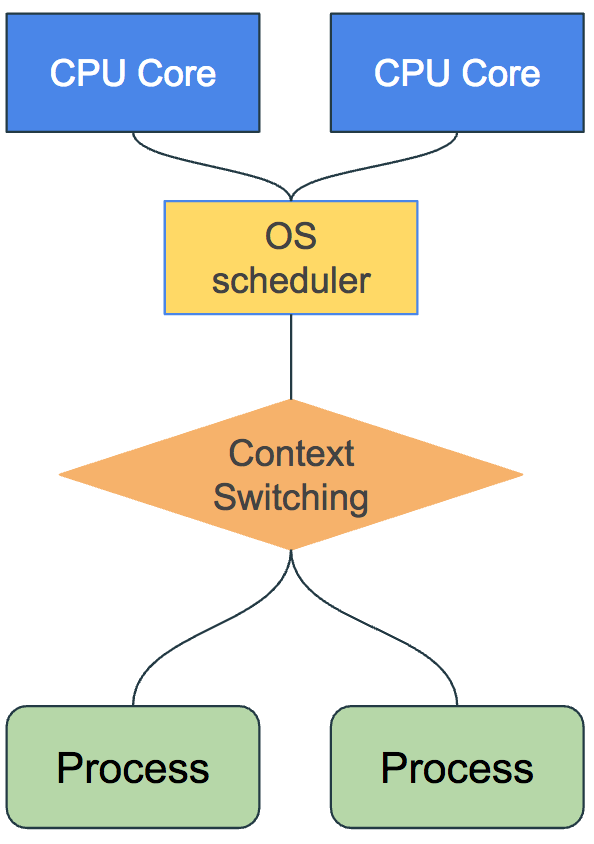
In order to receive computational time on the CPU, threads rely on what is called the OS scheduler. This mechanism allows them to execute code they contain. The OS Scheduler is in charge of fairly allocating computational resources to each thread and process by scheduling them on CPU cores for a specific duration.
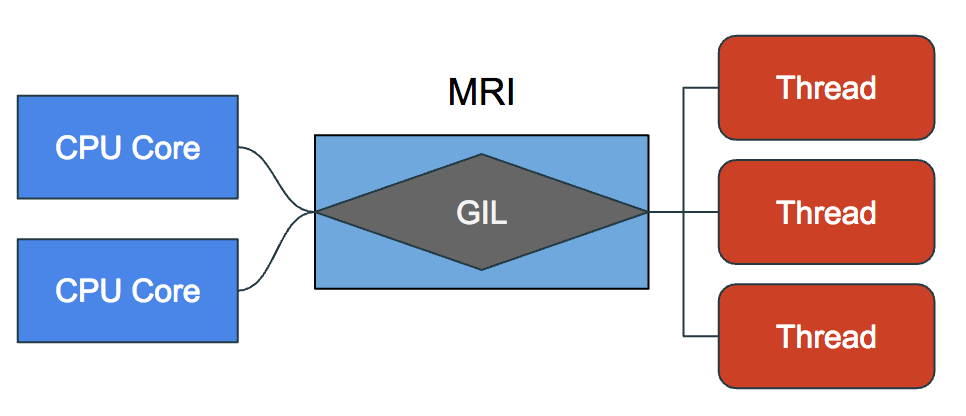
In MRI (Matz Ruby Interpreter, aka CRuby, the main Ruby implementation that we are all used to), threads enable concurrency but do not execute in parallel. This is because of the Global Interpreter Lock (GIL). Each thread can be scheduled to receive some CPU time by the OS scheduler but with the limitation of having the executing MRI process not being able to receive computational resources from more than 1 CPU core at a time.
With this limitation it does not seem to make a difference to add threads. We will just be executing jobs concurrently but it will take the same amount of time. The OS scheduler will allocate the computational resources from a single CPU core between the Threads sequentially, by invoking Context Switching, but not in parallel.
Our jobs are IO bound because they require a trip over the wire: sending a request to the Email Service Provider API and receiving a response once the email has been sent. This trip over the wire takes 50 ms on average. Having an IO bound job executing inside a thread means that this thread will be put in a sleeping state for 50ms. During this time the OS scheduler can schedule any of the 4 other threads to a CPU core which will also be put in a sleeping state for 50 ms during the trip over the wire. This way we will have 5 workers sleeping at the same time and all waiting on IO to keep executing. Once a worker receives a response it will keep executing once the OS scheduler schedules it again on a CPU core.
The point here is that we cannot have threads running in parallel, but if the job being executed inside a thread has to wait on IO for 99.99% of the total execution job time then multiple threads can spend almost all of this time waiting simultaneously, in parallel, instead of having a single thread waiting on all jobs sequentially.
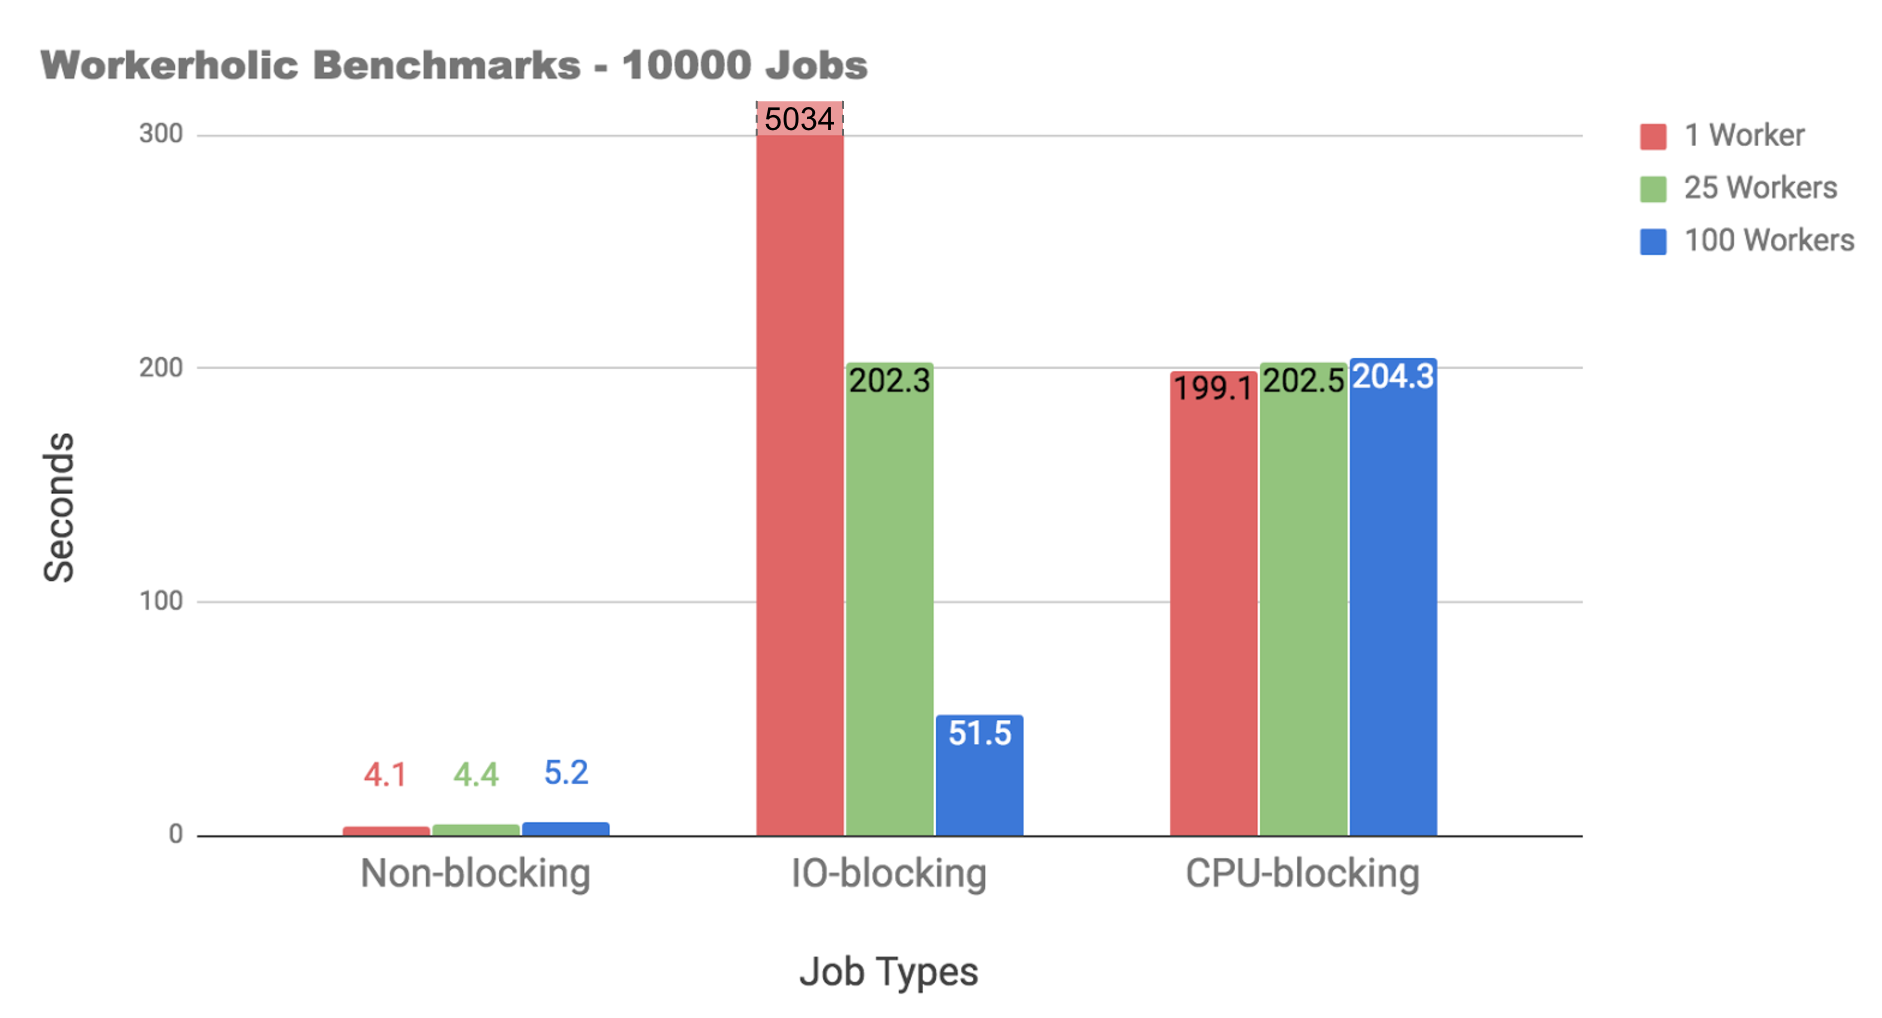
After implementing Concurrency by using multiple workers in Workerholic we decided to benchmark, using MRI, the effect of having multiple workers working on different types of jobs:
Non-blocking jobs: empty jobs
CPU-blocking jobs: calculate primes up to 1,000,000
IO-blocking jobs: sleep for 500ms to simulate a third party API call (based on GitHub API call response time)
As we can see from the results here:
for non-blocking and CPU-blocking jobs: having multiple workers doesn’t help the situation because of the GIL in MRI. In fact, it makes it worse due to the overhead incurred from context switching between threads.
for IO-blocking jobs: with one worker, it would’ve taken a very long time, 5034 seconds (the y-axis has been capped to give a better representation of the rest of the data). With 25 workers, the jobs perform about 25x faster. With 100 workers, it’s about 100x faster.
In the next section, we will take a look at how concurrency is implemented in Workerholic.
Concurrency in Workerholic
In the context of Workerholic, we introduced concurrency in order to improve performance by having our workers poll and perform the jobs from within a thread. This way, as shown earlier, if jobs are IO bound we can make use of concurrency in order to maximize the dequeuing and processing throughput and bring that enqueueing:processing ratio down to a 1:1 ratio.
In Ruby, we pass a block to Thread.new in which we poll from from Redis and process the serialized job, if any:
In the next section we will look at how creating new Threads impacts the consumption of the available memory.
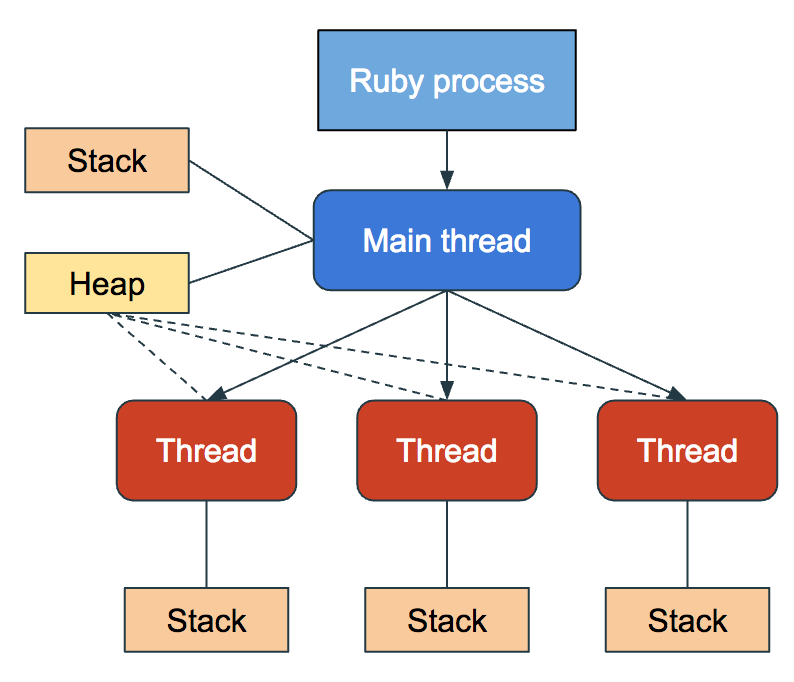
Threads and Memory Consumption
A Ruby process can spawn multiple threads. The memory model for a thread is as follows:
Each thread has an independent stack and the heap is shared between the main thread and all child threads.
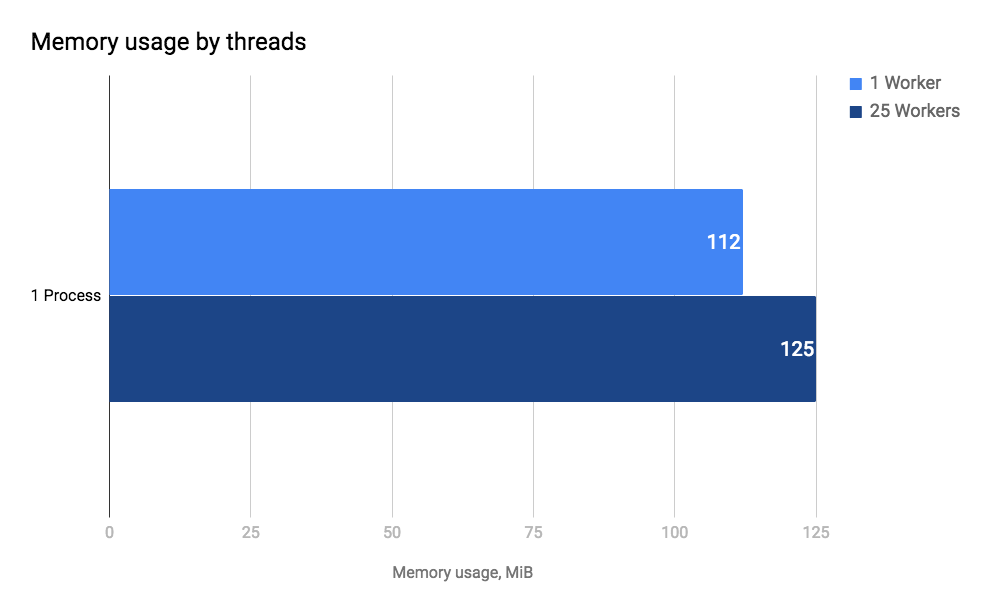
For our email-sending job example above, we can spawn as many threads as we’d like to increase our processing throughput. But what happens to our memory footprint?
As shown in the above bar chart, spawning 24 additional threads has a relatively low impact on memory consumption. That is because threads are cheap, and most of the memory footprint comes from the heap, which is shared among all the 25 threads.
Now that we understand how threads can enable concurrency and help us solve the problem at hand, it is also important to understand how they can be dangerous and unpredictable.
Concurrency Issues & Thread-Safety
While spawning more threads is cheap and significantly increases processing throughput, multi-threading introduces a new concern called thread-safety. When code is thread-safe, it means the state of the resources behave correctly when multiple threads are using and modifying those resources.
In MRI, core methods are thread-safe, so we don’t need to worry about them. However, user-spaced code might not thread-safe and may introduce what is known as race conditions. Race conditions occur when two or more threads are competing to modify the same resource. This happens because the atomicity of the operation is not guaranteed and the OS scheduler can interrupt the execution of code at any time and schedule another thread. Let’s take a look at the following example:
In the code snippet above, we have a global variable $balance and a PaymentJob class with an instance method perform which mutates $balance by incrementing it by one, 1,000,000 times. We then create 10 threads, and have each thread create a new instance of PaymentJob and call perform on it. In the end, we should have a $balance of 10,000,000. Let’s run this program and see what we get:
    $ ruby concurrency_issues_example.rb
    $ Final balance: 3000000
    $ ruby concurrency_issues_example.rb
    $ Final balance: 6000000
    $ ruby concurrency_issues_example.rb
    $ Final balance: 5000000
As we can see here, that is definitely not the case. Why?
Because the code above is not thread-safe. As mentioned earlier, when we have multiple threads trying to access and modify the same resource, $balance in this case, we have a race condition. A thread can enter the perform method which first sets current_balance = $balance, and then the OS scheduler can pause that thread and run another thread to do the same thing. So now we have two threads (and potentially more) starting with its current_balance at 0. In the end, your final balance can be any multiple of 1,000,000 between 1,000,000 and 10,000,000. In other words, we cannot guarantee that the code will work as expected, and results may be different each time we run this program.
Let’s look at another example in order to understand how tricky concurrency issues can be:
The above example should produce the same result as the previous one. The difference here is that instead of having perform increment new_balance by one, 1,000,000 times, we increment it by one, one time, and call perform 1,000,000 times.
    $ ruby concurrency_issues_example.rb
    $ Final balance: 10000000
    $ ruby concurrency_issues_example.rb
    $ Final balance: 10000000
    $ ruby concurrency_issues_example.rb
    $ Final balance: 10000000
As we can see above, it seems like everything works fine in this context. Why?
Because the perform method is so cheap in terms of computational resources that the operation performed in it becomes atomic and, thus, doesn’t introduce a race condition. The problem with this example is that the atomicity of the operations executed in the perform method is absolutely not guaranteed and we cannot rely on the fact that it should work.
These examples are used to demonstrate that in the context of Workerholic, jobs should be thread-safe. If we cannot guarantee that our jobs are thread-safe then we should only use 1 worker. So, we would only have one thread and spin up multiple instances of Workerholic if more processing throughput was needed. This will introduce parallelism, which is another way of maximizing the processing throughput.
Parallelism
Concurrency alone is good enough for IO-blocking jobs, but as you saw in a previous chart, it does nothing for CPU bound jobs. Why? And what can we do to maximize processing throughput for CPU bound jobs?
Image Processing Jobs Calculations
A common CPU-blocking job is image processing.
In the context of our scenario let’s say an image processing job takes 4 seconds on average.
As we mentioned earlier, we have a large Rails application with 1000 QPS and 1% of these queries involve image processing, which means we have 864,000 image processing jobs per day
Multiply 864,000 by 4s and you have 960 hours worth of processing lined up in a period of 24 hrs, giving us a 1:40 enqueue:processing ratio.
Similarly to the email example, this insight raises two issues:
Increased latency: every 24 hours, there are 864,000 image processing jobs that need to be performed. This would take 960 hours (40 days) to complete. Consequently, any job enqueued after the first 24 hours won’t be executed until the next 936 hours (960 - 24) have passed, effectively increasing the latency by 936 hours per day.
Storage limit:
In the context of Workerholic a serialized job takes about 26 bytes of memory in Redis.
Each day, we have a backlog of 864,000 - 864,000 / 40 = 842,400 image processing jobs that still need to be processed.
These jobs would take 842,4000 * 26B = 20.88 MB of memory in order to be stored in Redis. At this rate, our jobs storage space would be reaching the storage limit after 196 (4096 / 20.88) days.
With our current naive approach we have the latency increasing at a rate of 936 hours per day, along with the jobs storage space increasing at a rate of 20.88 MB per day. This would make for a very inefficient background job system.
The challenge for us here is to balance out the enqueuing throughput and the dequeuing throughput. Let’s focus on increasing the processing throughput.
Parallelism & Processes
As mentioned earlier, image processing jobs are CPU-bound because the main computational resource they require is CPU time – there is no IO downtime during which it can be put into a sleeping state. That is why we cannot take advantage of multithreading for this type of jobs in the context of MRI.
Since our machine has multiple CPU cores, we can take advantage of this fact by running multiple processes in parallel.
When the CPU has multiple cores, the OS scheduler is able to schedule different processes to different CPU cores, effectively enabling parallelism.
The CPU cores run in parallel, hence, if we have two CPU cores we can have computational resources allocated to 2 different processes at the same time, effectively allowing them to run in parallel.
Since we have 4 cores, we can spin up 4 processes and reduce the enqueuing:processing ratio from 1:40 to 1:10.
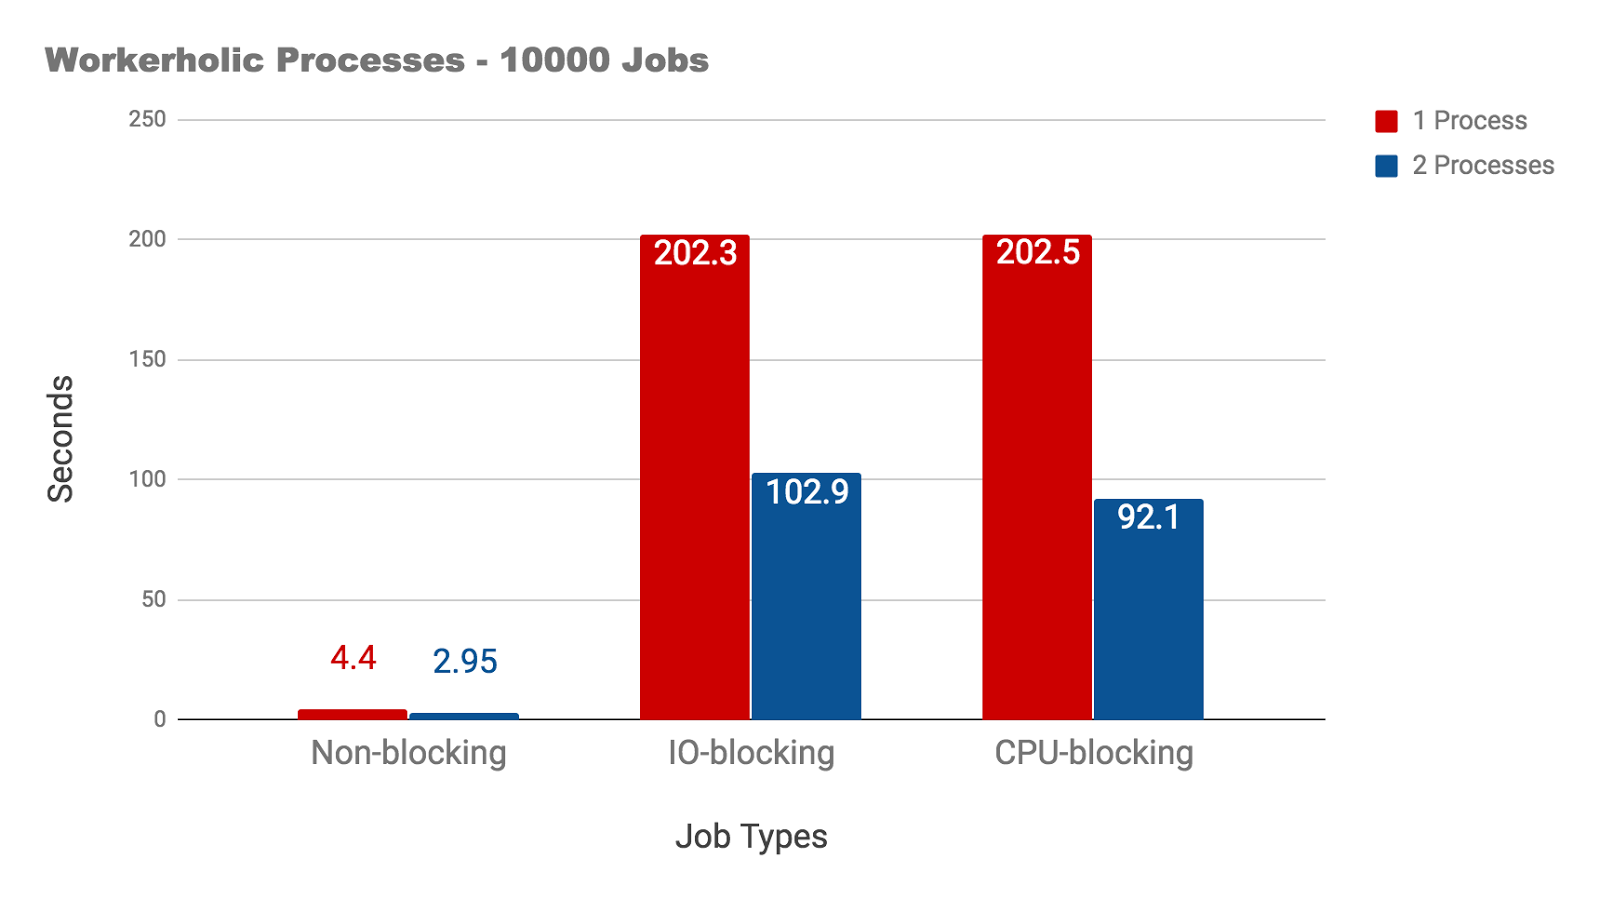
We benchmarked how Workerholic performed when we ran 2 processes vs. 1 process:
As we can see, having more processes translates into increased performance. In each of these cases, the processing time is divided by two. This is not a 100% guarantee, some factors need to be taken into account, such as:
other processes running and requiring some computational resources, effectively reducing the CPU time scheduled for our processes
relying on the OS scheduler for optimizing the sharing of computational resources, effectively introducing randomness from our point of view
In the next section we will see how we introduced parallelism specifically for Workerholic.
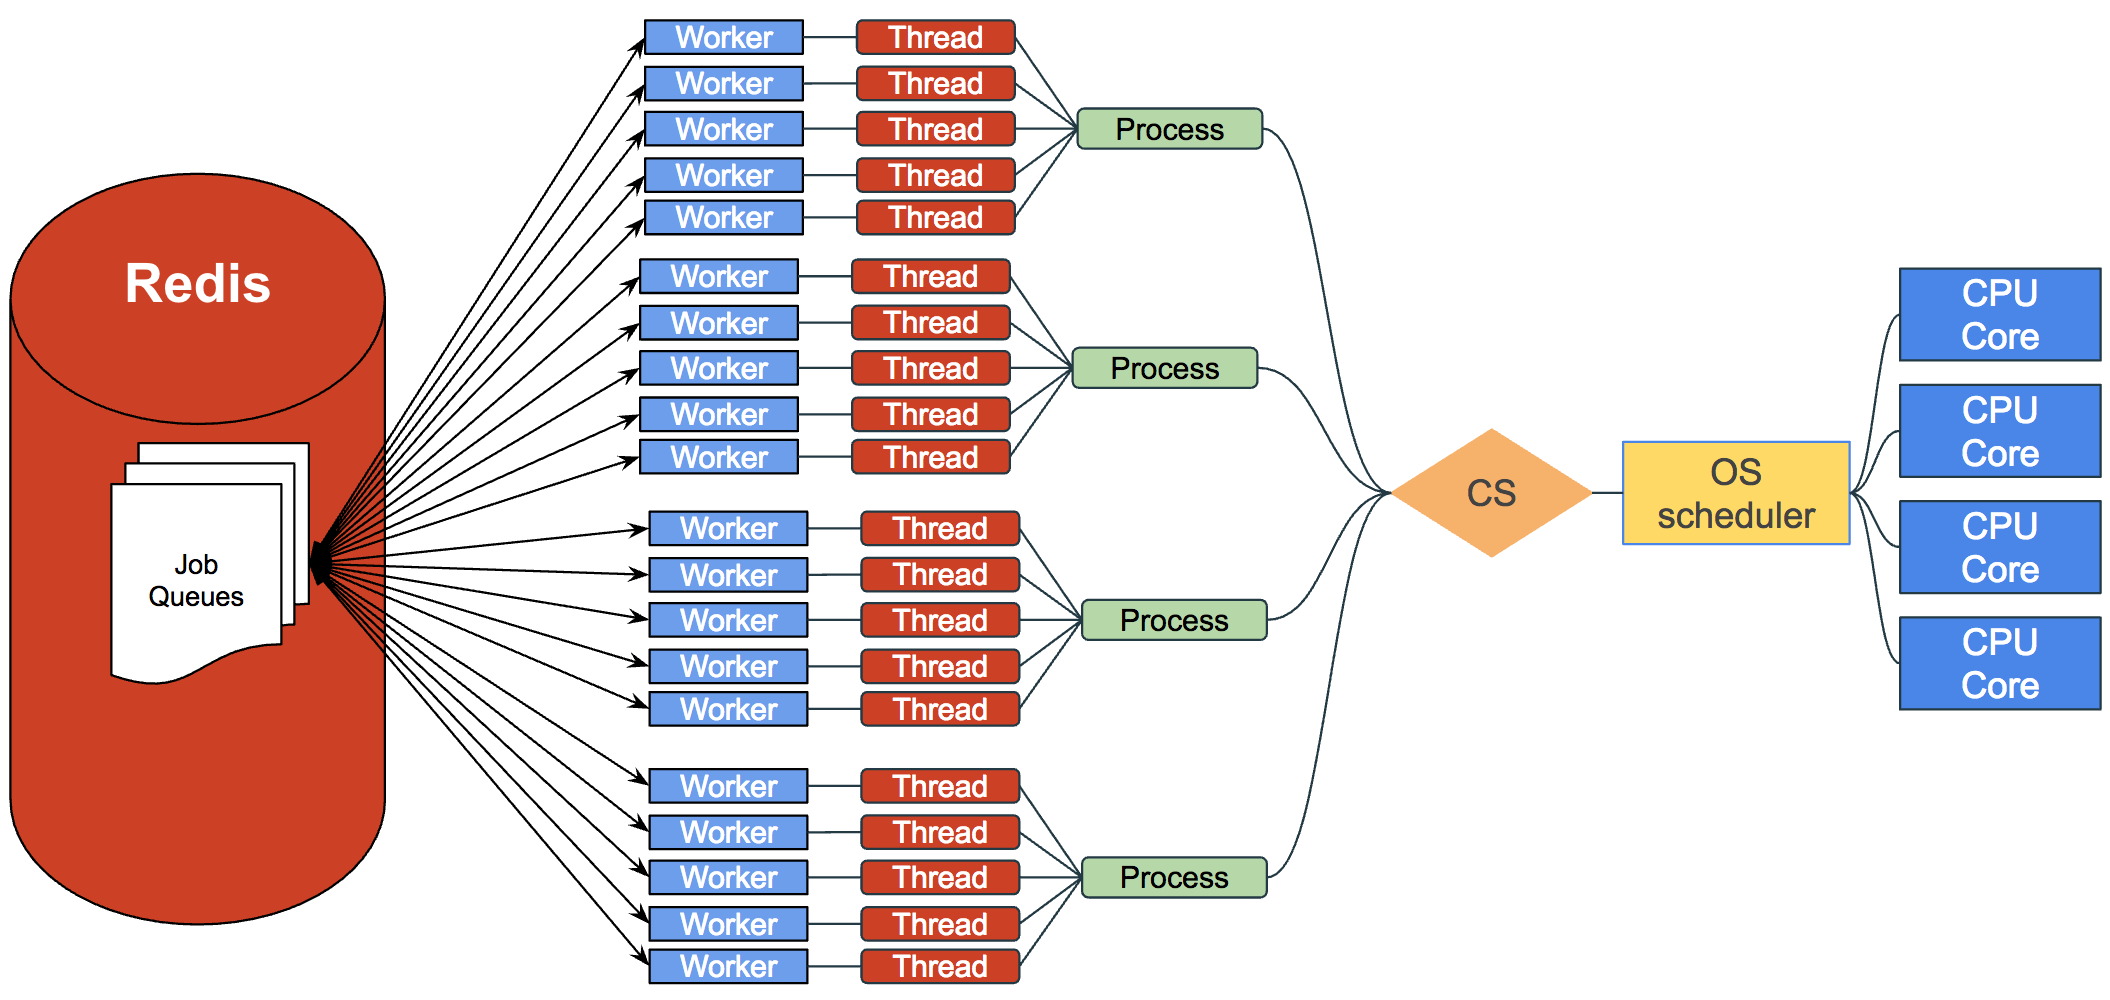
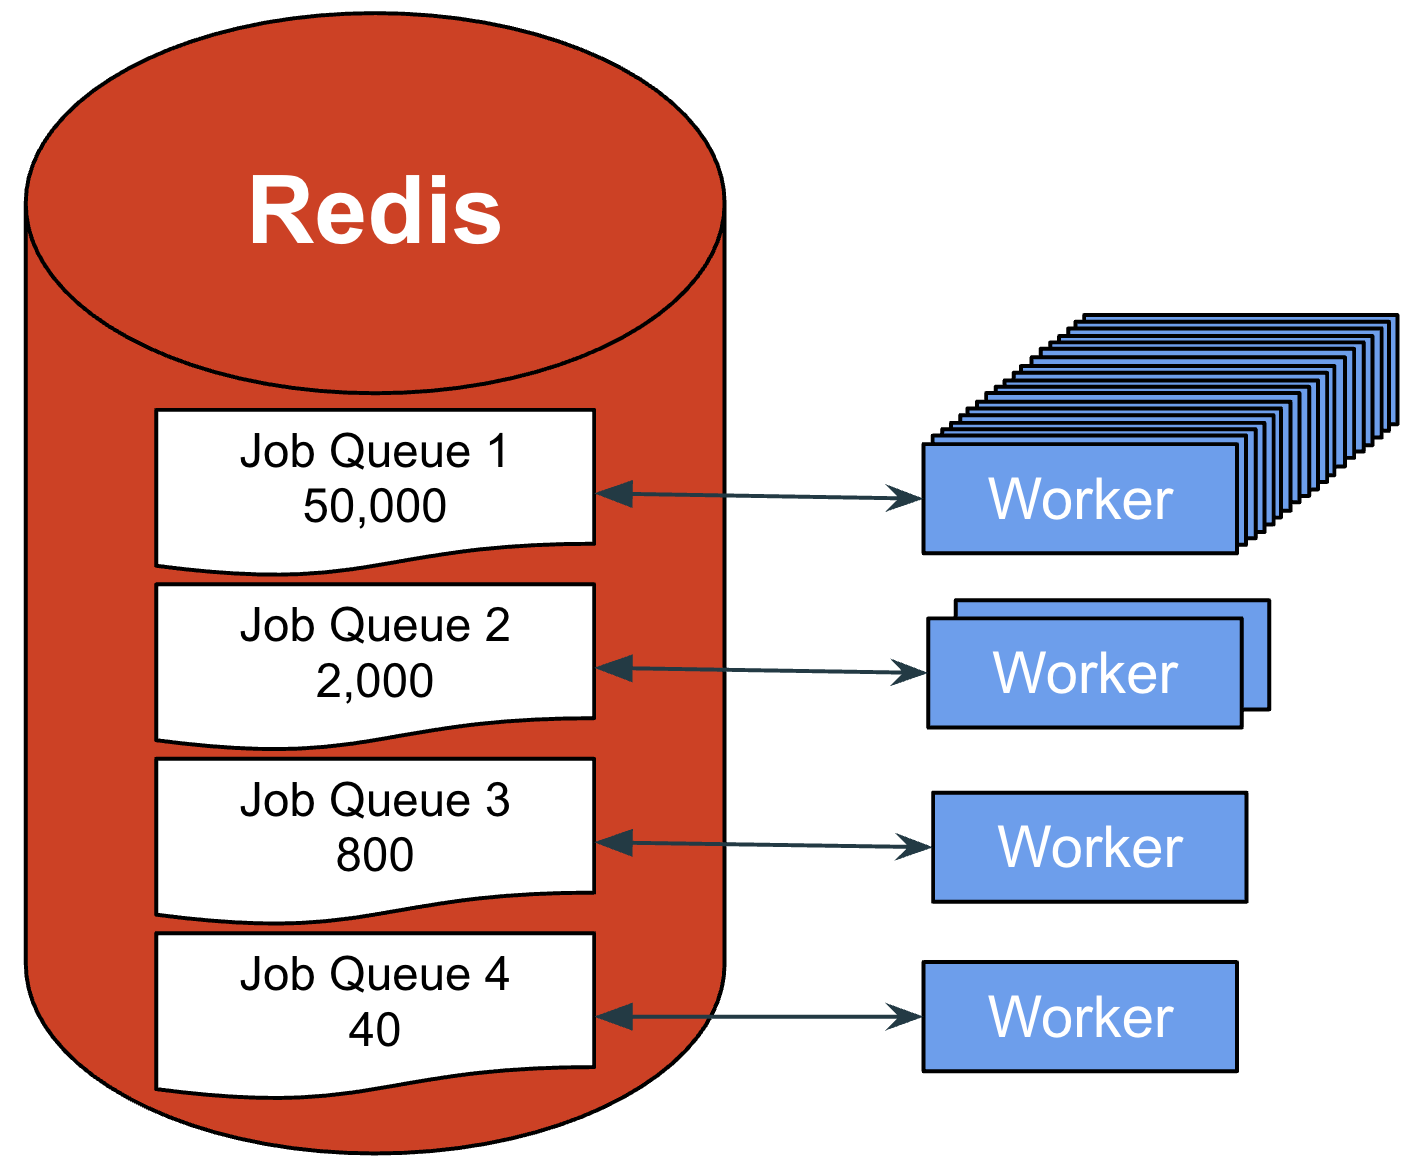
Parallelism in Workerholic
The diagram below shows how Workerholic uses multiple processes if we had the CPU cores available to do so. The OS scheduler pushes / evicts processes from the CPU and each process has its own worker threads that can poll jobs from Redis and work on them. Consequently, if we have four CPU cores we can have computational resources allocated to four different processes potentially at the same time, effectively allowing them to run in parallel.
Here is the code we wrote to make the above model possible:
We fork processes if the user specified the option when starting Workerholic. Then we fork the number of processes specified minus one since the main process will serve as one of these processes, effectively having 1 parent process and N - 1 child processes. We make sure to store the processes ids pid, inside a PIDS constant for future reference. In each of these child processes we start the manager, which starts all the workers and the other components such as the Job Scheduler. Once these child processes are started we start the manager in the parent process.
In the next section we will look at how forking child processes impacts memory usage.
Processes and Memory consumption
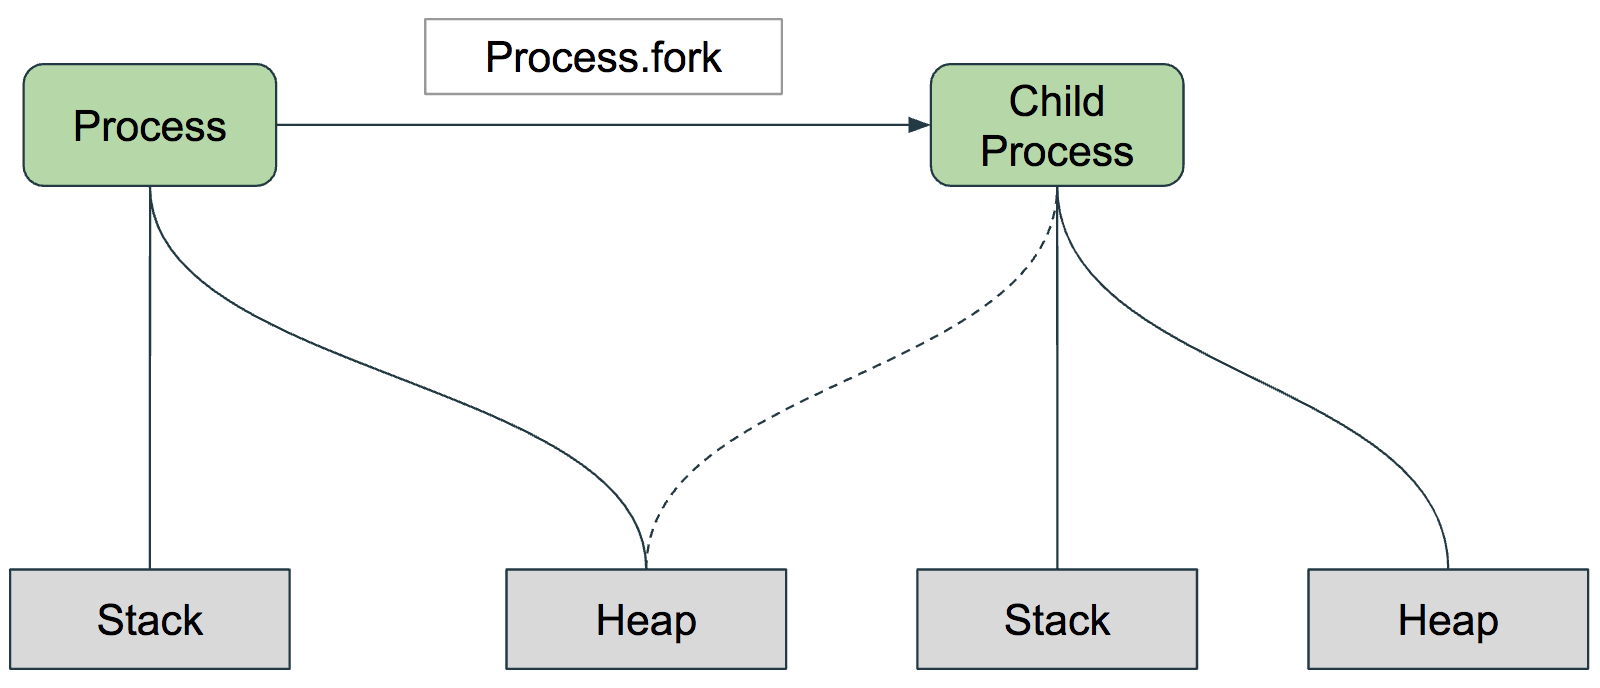
A Ruby process can fork multiple child processes. The memory model for a process is as follows:
Each process has its own address space, stack, and heap. When a process is forked, a child process is created with its own stack. As for the heap, depending on the OS the copy-on-write mechanism might be employed:
child processes start by referencing the parent’s process heap, effectively sharing the same resources with the parent process
as modifications to the resources on the heap occur, child processes write the mutated resources to their own heap, leaving the parent’s heap unmodified
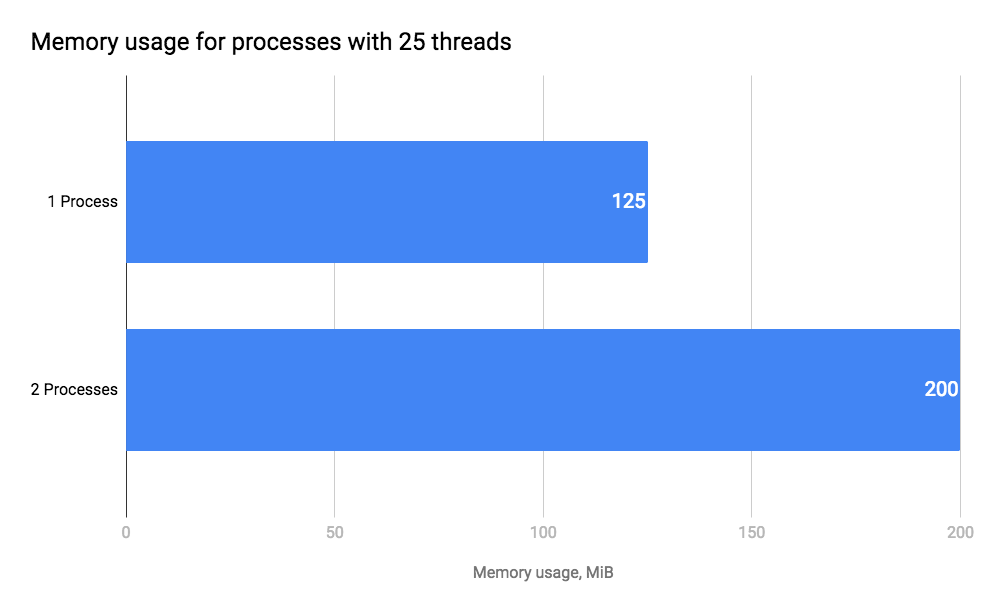
We benchmarked the memory consumption of having one process and two processes by using a Rails application:
Having one process takes up 125MB of memory, but having two processes doesn’t take twice as much memory. This is the copy-on-write mechanism at work.
Let’s assume the Rails application in our scenario is a pretty big Rails app and takes about 400MB of memory. By forking 4 processes, Workerholic will at most take 1.6GB out of 4GB of RAM, meaning forking 4 processes is a viable option.
As we mentioned previously, by using our four CPU cores, we can fork a total of four processes and reduce our image processing enqueuing:processing ratio down to 1:10. But that is still not good enough. After an extended period of time, we will eventually end up with a backlog of jobs, effectively imposing a huge latency and memory footprint. What else can we do to balance out our enqueuing:processing ratio?
Scalability
Scaling in the context of our scenario
We are currently maximizing the use of available resources by relying on concurrency and parallelism. In order to bring our enqueuing:processing ratio down to 1:1 we need to scale either vertically or horizontally.
Scaling vertically
Scaling vertically means increasing the amount of available resources by getting a better machine or adding more hardware resources to the existing one. We currently have 4 CPU cores and 4GB or RAM. By looking at the Digital Ocean offerings, the best machine has 20 CPU cores and 64GB of RAM. If we were to use one of these machine instead of what we have right now, we would be able to bring our enqueuing:processing ratio down to 1:2. The memory footprint for 20 processes will be around 8GB (20 * 400MB) at worst, which is acceptable since this machine would have 64GB of RAM.
A 1:2 ratio will still generate a backlog of jobs, which is why in this particular case we also need to scale horizontally to accommodate the load.
Scaling horizontally
Scaling horizontally means increasing the amount of available resources by introducing multiple machines into the setup. This gives us two options:
keep our original configuration and spin up multiple identical machines. In our case, we would need 10 machines since we have a 1:10 enqueuing to processing ratio.
scale vertically first by getting a better machine, such as the one described in the previous section (20 cores, 64GB of RAM) and get multiple identical machines. In our case, we would need 2 machines since we have a 1:2 (enqueuing:processing) ratio.
Whichever option is chosen, they will both even out the enqueuing to processing ratio, which was our initial goal.
By choosing any of these two options we need to consider the fact that for this to be possible we need to have a BJP that is scalable. In the next section, we will look at how this is done for Workerholic.
Workerholic: a scalable BJP
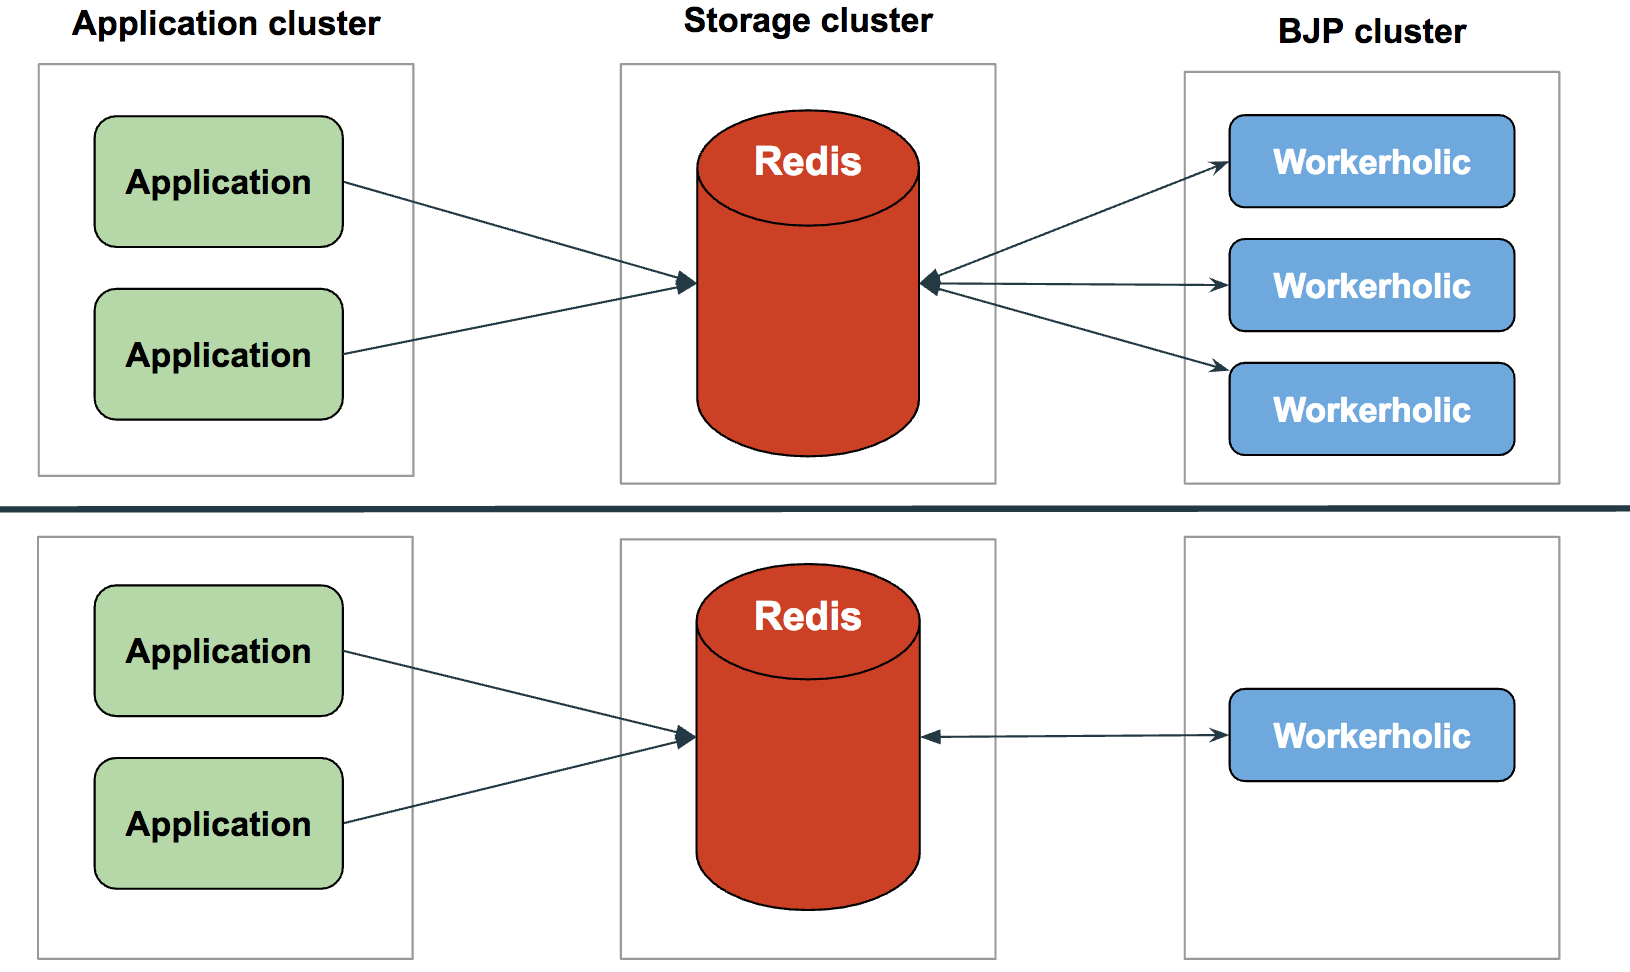
Workerholic is scalable because we use Redis as a central data store for the jobs. Workerholic will still need access to the source code of the main application, but won’t be tied to a specific instance of the main application. Regardless if there is a web servers cluster or a single web server, Workerholic will still work the same. It is only concerned with what is enqueued in Redis - not how many main application instances are running. Workerholic is also scalable because its workers don’t have a state except for the queue they’re polling from, which is synchronized with Redis and dynamically updated every second on the Wokerholic’s side.
Workerholic is reliable, scalable and employs concurrency and parallelism to be efficient. How does it compare to a gold standard like Sidekiq? What other optimizations can we introduce?
Optimizations
When building a BJP it is important to see how the current implementation compares to a leader in the field. We decided to benchmark Workerholic against Sidekiq in order to get some context as to where Workerholic stands and if we could optimize its performance.
Serialization
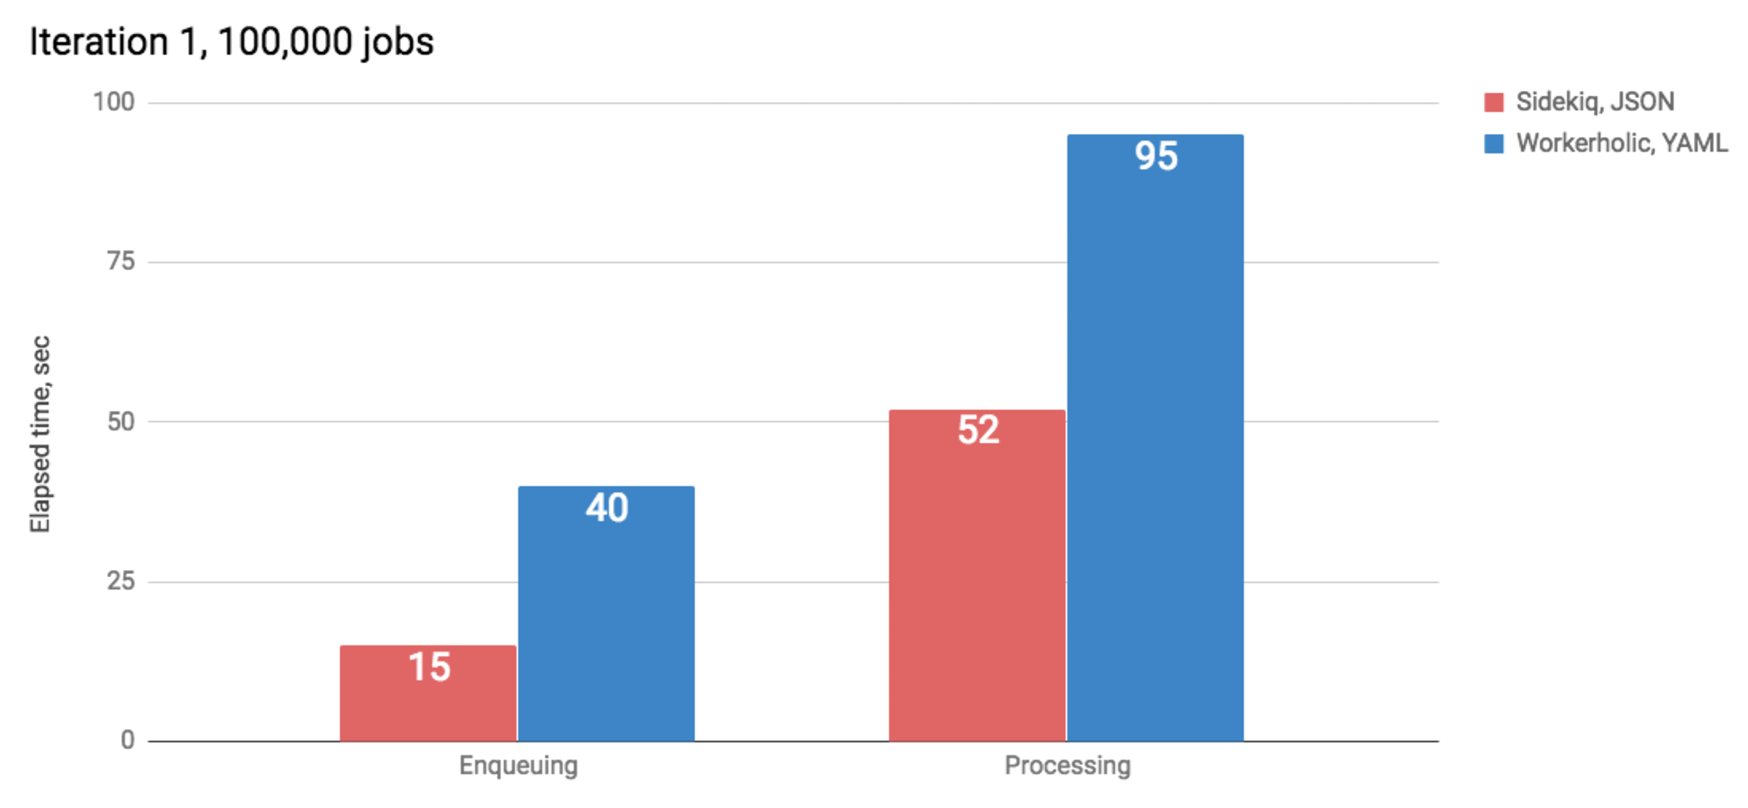
On our first iteration, we found that there was a great difference between Workerholic and Sidekiq; the former was much slower on both the enqueuing and the processing sides:
What was our bottleneck? Sidekiq uses a similar application architecture: concurrency via the use of threads. The difference seemed too big, especially since Workerholic should be a lighter BJP with less features and edge cases covered.
The first thing we noticed is that both the enqueuing and processing sides were slower. This gave us a major insight into realizing it was a bottleneck present on both ends of the application. We started wondering if the way we serialize our data may be the problem. Indeed, we were using YAML while Sidekiq was using JSON.
So we decided to switch to a JSON serialization. The following YAML serialization:
After switching to JSON we benchmarked Workerholic against Sidekiq one more time:
We were able to reduce our enqueuing time by 70% and processing time by 55% compared to our previous YAML iteration!
Here the point is not to show we’re slightly faster than Sidekiq, because we probably aren’t: we were benchmarking without logging out every single enqueued job and processed job, which slightly decreases the performance. But we are on par with Sidekiq’s performance which is a great victory!
We have improved our efficiency by changing our serialization strategy. Can we optimize Workerholic even further?
Using Custom Algorithms
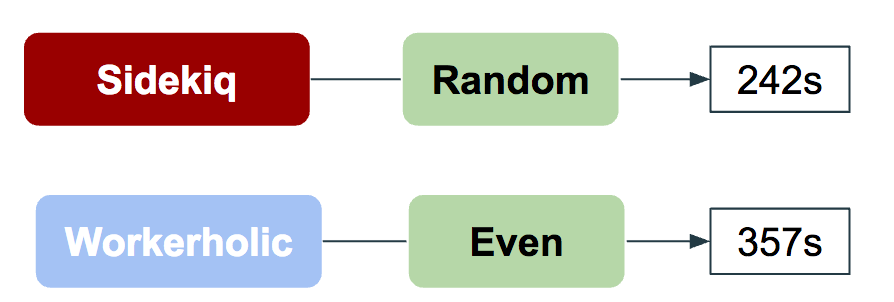
For this optimization we decided to benchmark Workerholic against Sidekiq by using 10,000 non-blocking, CPU-blocking, and IO-blocking jobs.
As shown in the above diagram, it took 242 seconds for Sidekiq to process every job by using its random polling algorithm. We decided to start with a simple and dynamic algorithm: evenly-balancing workers.
Evenly balanced workers
The purpose of this algorithm is to fairly distribute workers between each queue by dynamically assigning a queue to a worker, every second. This way if a queue is empty the workers that were polling from it can be evenly redistributed between the non-empty queues.
Once we had a working implementation of the algorithm we decided to benchmark against Sidekiq using the same scenario from the previous example:
The algorithm performed poorly compared to Sidekiq’s random polling: it took 357 seconds to complete the same number and type of jobs with our algorithm. This is because in the context of CPU-blocking jobs having multiple workers would not make a difference as compared to having one worker (when using MRI).
How can we improve Workerholic to perform better?
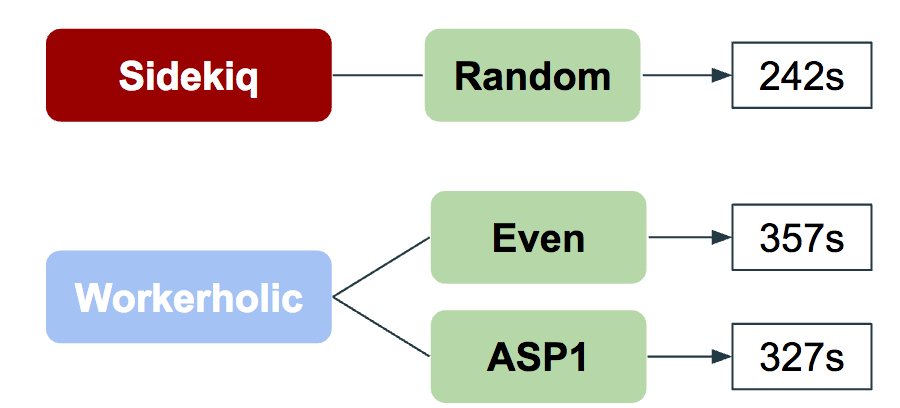
Adaptive and Successive Algorithm (ASP)
Iteration 1
We decided to create a different algorithm: we called it Adaptive and Successive Provisioning (ASP) of workers based on queue load. This would allow workers to switch faster to IO queues in case there are any because CPU-bound jobs are usually executed at a faster rate than IO blocking jobs. Once again we benchmarked using the same amount and type of jobs:
The jobs were executed faster than our evenly-balancing algorithm, but still much slower than Sidekiq’s random polling. We thought we could do better and make Workerholic more efficient, which is why we went through a second iteration for our ASP algorithm.
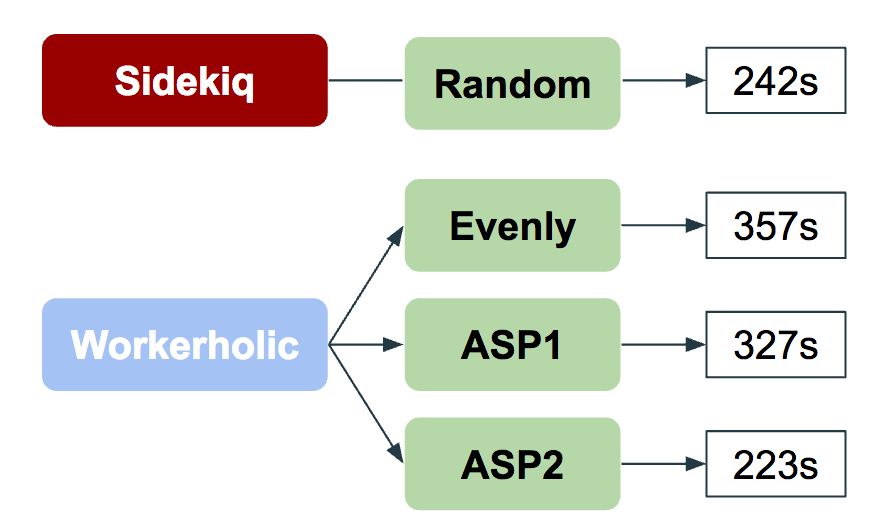
Iteration 2
We decided that we needed a way to distinguish between queues containing IO-bound and CPU-bound jobs. Our first iteration of ASP was an improvement, but in the case of having queues containing CPU-bound jobs we were still potentially assigning more than one worker.
The way we identify which queues contain IO-bound jobs is by asking the user to flag such queues by appending -io to the queue name. This way when we use our ASP algorithm we make sure to only assign one worker per queue containing CPU-bound jobs and auto-balance the rest of the queues, which would be flagged as queues containing IO-bound jobs. As you may recall, having more workers on CPU-blocking jobs makes no difference, which is a waste of Workerholic’s resources.
As shown in the above diagram, the performance for this algorithm is much closer to Sidekiq’s random polling and it is performing better in the example scenario. Which is another great victory for us since we wanted to show how to build a BJP that would perform closely to the leaders in the field.
Note: We chose Sidekiq to benchmark against because it is the leader of background job processing in Ruby and we thought that this is the bar we should aim for. These results should not be interpreted as our way of saying that Workerholic is faster than Sidekiq. Workerholic is in its alpha stage and should not be used in production environments - the main goal of this project is to share our experience and knowledge with the community as well as introduce features and steps needed to build a BJP.
An Example
Let’s walk through the implementation of this ASP algorithm by looking at an example:
We start with different queues, each having a different load. There are 25 workers, which is Workerholic’s default configuration.
When Workerholic starts, so does our WorkerBalancer component, which will default to evenly balancing workers algorithm unless theauto option has been specified.
Then we need to identify the IO queues and provision them by using our algorithm. In order to provision the queues we first need to calculate the average number of jobs that each worker should be executing if they were all given the same number of jobs. If queues were flagged as containing IO-bound jobs then we would only consider the load on these queues when calculating this average number of jobs per worker.
Once the average number of jobs per worker is calculated we provision each queue with the adequate number of workers based on its load. Here is the implementation:
we have now provisioned the queues with all 25 workers
Next, we will start looking at how we can help the user make a better decision about her background job system.
Reporting
Reporting is an important feature to implement when building a BJP. It allows developers to gain insight into the overall state of jobs, their types, jobs that failed, and how many of them complete over time. This information can be used to make better decisions about adjustments needed to the background job system.
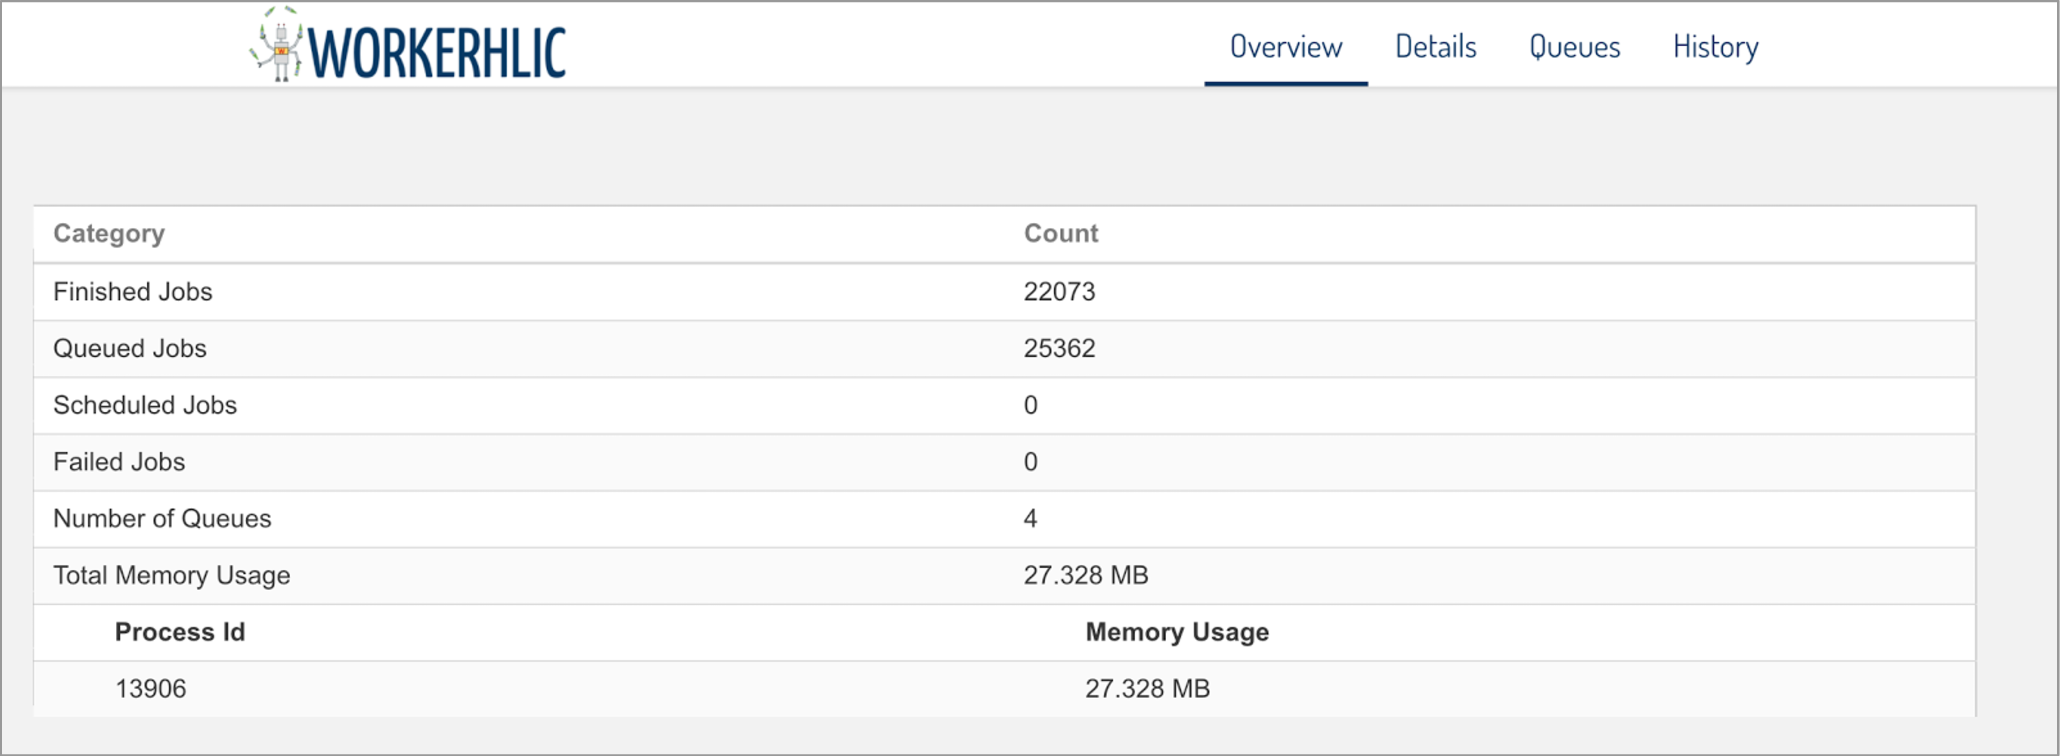
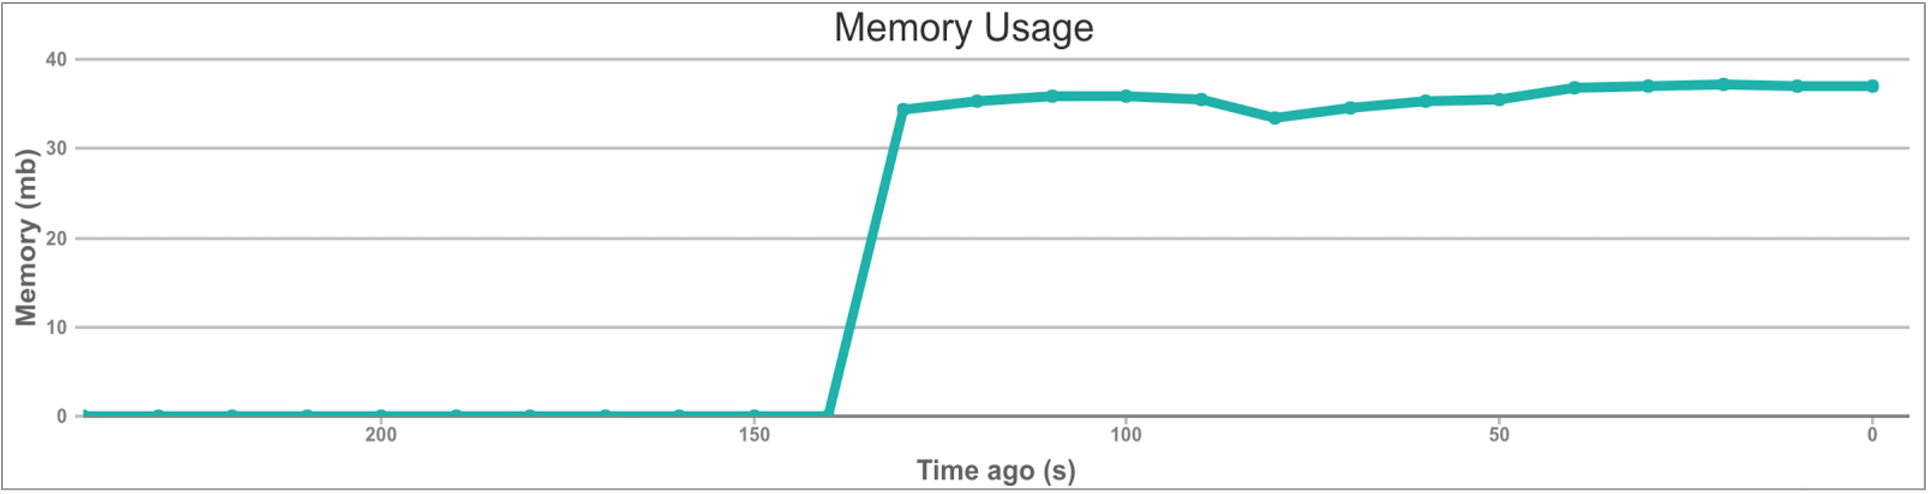
A sneak peak into the overview page of our Web UI:
Real-time Statistics
What data to collect?
We decided to have Workerholic show our users aggregate data for finished jobs, queued jobs, scheduled jobs, failed jobs, current number of queues, and the memory footprint over time, as well as the breakdown of jobs for each class.
All this data is updated every 10 seconds, using AJAX on the front-end to query our internal API for the data.
Now let’s look into how we store this data.
How to store the data?
We decided to use Redis for the following reasons:
avoid using a new dependency
non-relational nature of our data
very efficient reads and writes (in-memory store)
automatic persistence to disk
convenient Redis data type, sorted set, for easy retrieval of data points by using a timestamp which corresponds to the job execution or completion time as a score
Here is how we save our jobs to Redis for statistical purposes:
We add serialized jobs to the workerholic:stats sorted sets in Redis with the completed_at timestamp as a score. This way when we want to retrieve jobs for the last 10 seconds we simply have to get all the jobs with a score between the current timestamp and the timestamp 10 seconds ago.
How much data?
Initially, we decided not to store live data and to just poll new data every 10 seconds. Once we introduced graphs into the web UI just polling for new data and throwing away stale data was no longer an option.
At first, we decided to store data on the front-end for a certain number of data points so we could generate graphs. This worked, but only if the user stayed on the page. If the user navigated away from the page, the data was lost. Instead, we decided to rely on Redis to store this data, up to 1,000 seconds, so we could have a total of 100 data points.
Note that we also do some cleanup and remove the jobs that exceed this 1,000 seconds threshold from our workerholic:stats sorted sets.
After solving the problem for live data we decided to introduce historical data so that users could have a broader view at their completed/failed jobs.
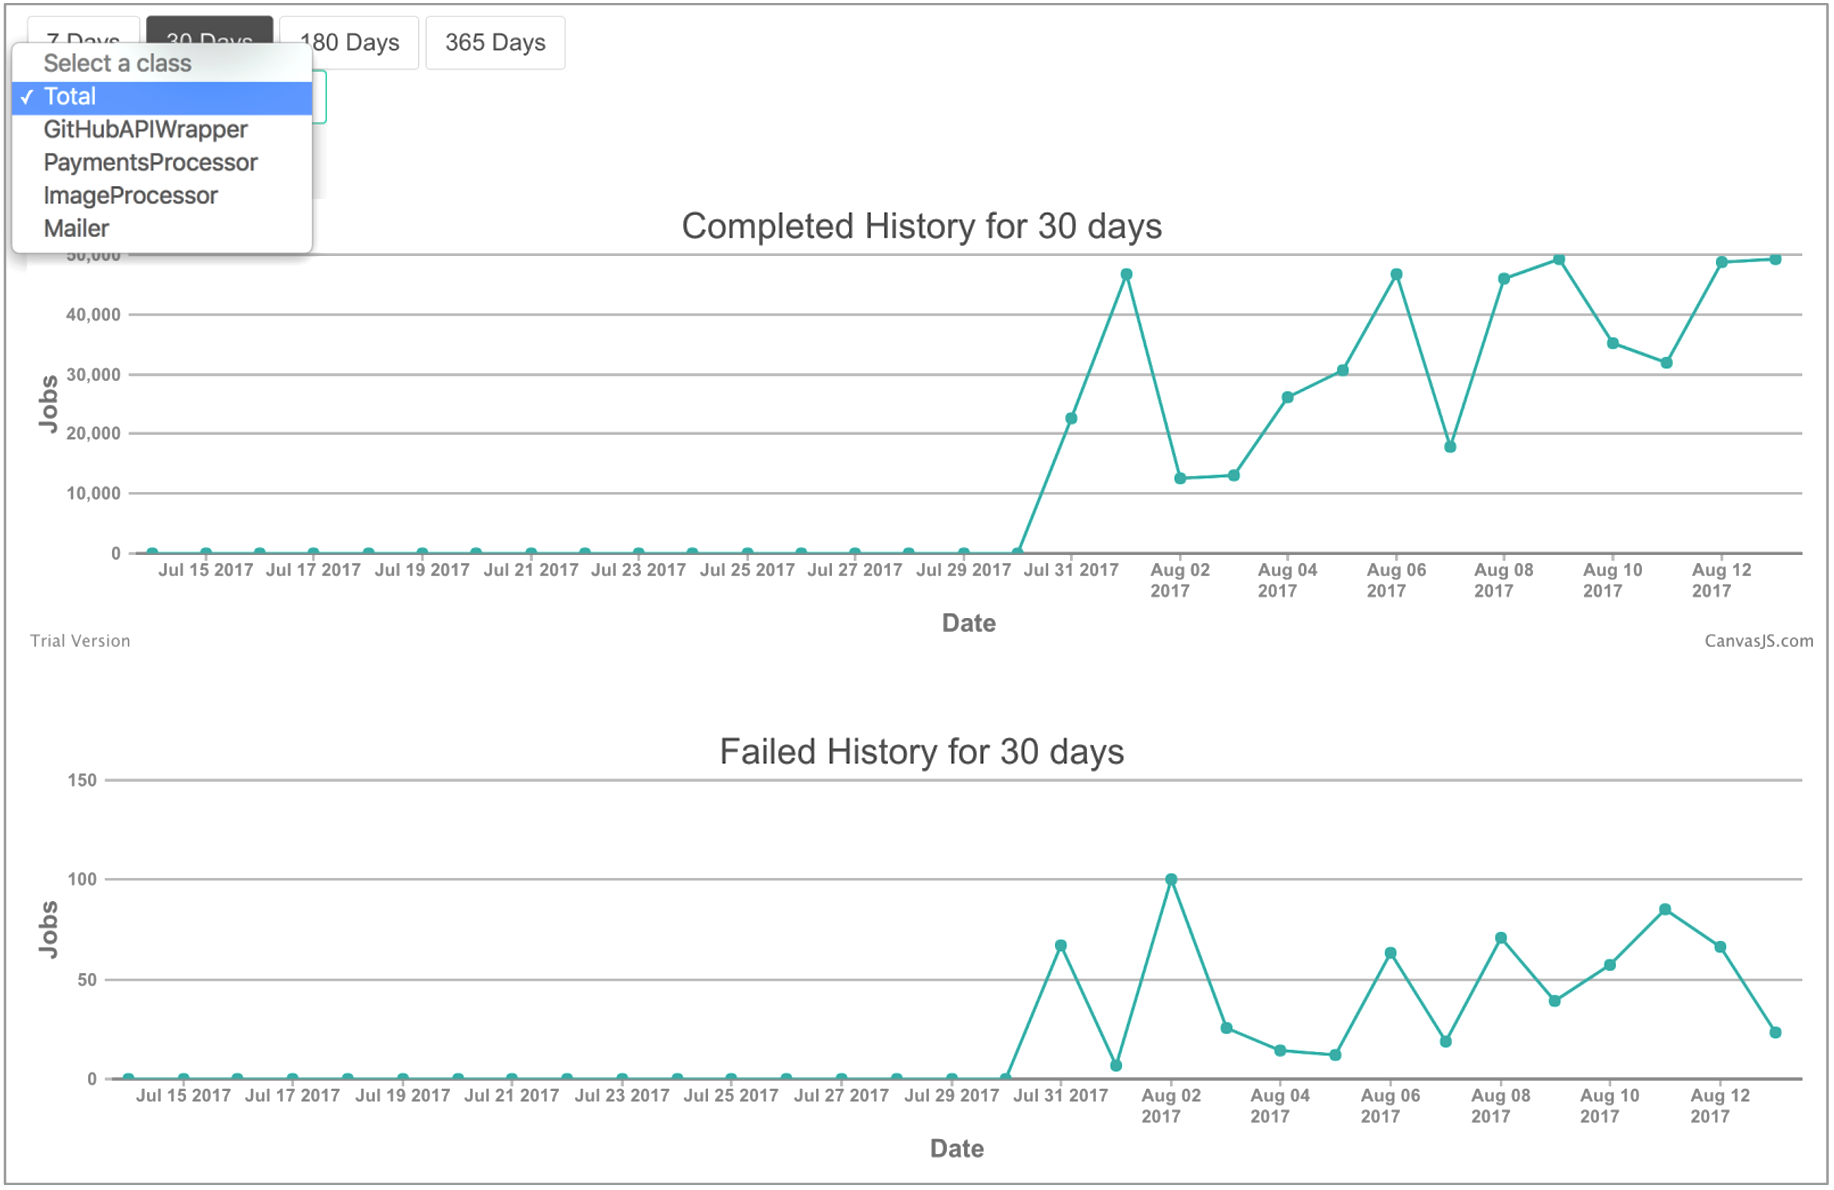
Historical Statistics
What data to collect?
We decided to display data for completed and failed jobs, as well as the breakdown for each class, up to 365 days. This way users would have a broad overview of their background jobs state over time.
How to store the data?
First Iteration
First of all, we decided to store aggregated data instead of serialized jobs. This way it would take much less space in Redis.
In our first iteration, we used a sorted set with the first timestamp of the day as a score. This approach would make it easy to retrieve specific data range from Redis.
In the code above the date range would be delimited by having the earliest timestamp of the date range as the minscore and the latest timestamp as the maxscore.
However, we ran into concurrency issues because we had to perform 3 separate operations, for which we could not guarantee the atomicity of this whole transaction: getting the count of jobs from Redis, removing the count from Redis, incrementing the count in our code and pushing the count back in Redis.
Second Iteration
In our second iteration, instead of a sorted set we decided to use a hash, with the timestamp as the field key and the count of jobs as the field value. This way we pushed the computation logic down to the Redis by using its convenient command for incrementing a hash field value:
By doing the above we avoid concurrency issues by relying on Redis executing the HINCRBY command in an atomic fashion.
Once we figured out how we wanted to store the data, we needed to think about how many data points to store.
How much data?
We decided to store data for up to 365 days.
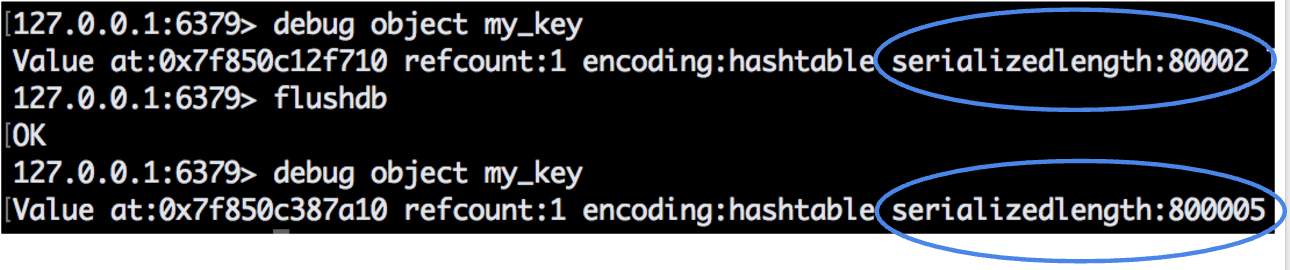
As a starting point we decided to look at how much space would a hash field take, with a timestamp as a field key and the number of jobs as a value field. To this effect we wrote a short Ruby script that would set 10,000 hash fields in Redis. Then we used redis-cli and the debug object command to get the size of the whole hash.
By looking at the image above, you can see that we also ran the script for 100,000 hash fields so we could check if the size is consistent. And since we have a difference of 10x, we can conclude that it is.
To get the average memory footprint each field would take we need to divide the whole size of the hash by 100,000, which gives us an average of 8 bytes per hash field.
Next, we made a few estimations:
We make an assumption that there would be 25 different job classes, and from there if we took one data point a day, that would give us 9000 fields which translates to 0.1MB. One data point per hour would give us 219,000 fields which translates to 1.7MB. And one data point per minute would give us 13M fields which translates to 100MB.
To be able to transfer data over the wire quickly when a user requests 365 days of data, we realized that one data point per day is the only viable option
In the next section we will start exploring additional features that can be added to a BJP and that we actually implemented for Workerholic.
Configurability
Another common attribute of BJPs is the ability to configure and adjust them to the needs of the developer. Some web applications may have millions of background jobs per day, while some maybe only have 10. In which case, it’s safe to assume that the main configuration options should not be set once and for all by the BJP’s developers - by not doing so we let our end-users take control of the most important parameters. In addition, this removes the guessing part on the BJP developer’s end - now there’s no need to think about every possible use-case that our users may have.
Common configuration options include grouping jobs by type (which means using multiple queues), enable parallel execution (especially in MRI) by spawning multiple processes, and be able to run on multiple Ruby implementations like JRuby or Rubinius. The challenge for us was to make Workerholic configurable to satisfy the needs of the majority of our users (or potential users).
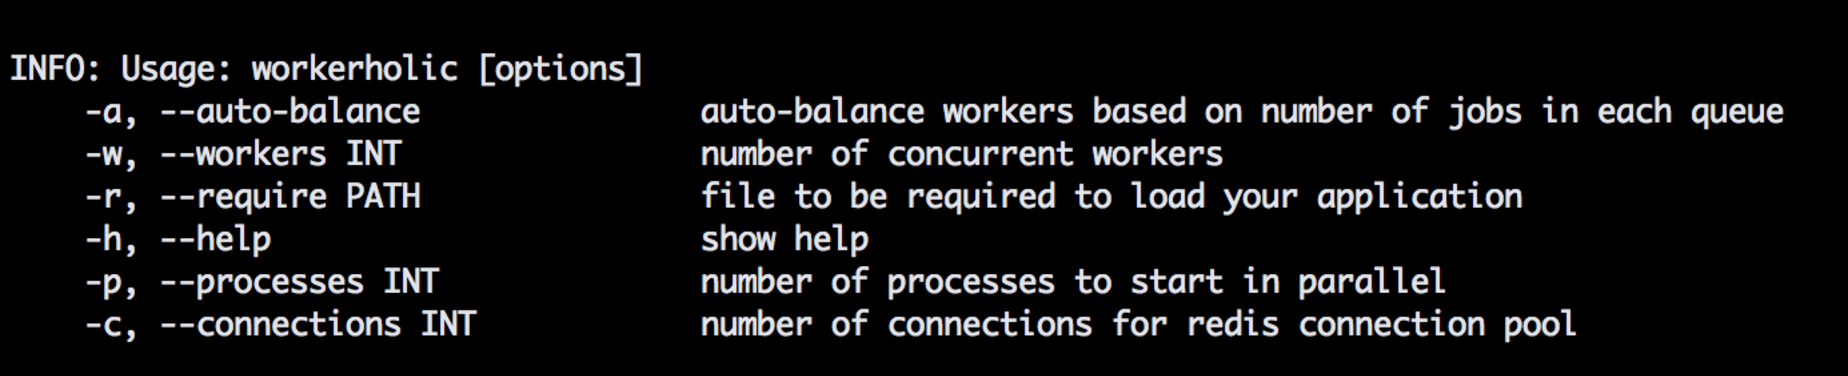
And the way we tackled the configurability problem was by having multiple configuration options. We provide an option to auto-balance workers, an option to set the number of workers per process based on application’s needs, an option to load application’s source code by providing a path, an option to specify the number of processes to be spawned and the number of connections in the Redis connection pool. All those options are available as a simple and intuitive API. And like all other good command-line tools, we have the --help flag to introduce these options to a new user.
Ease of Use
A background job processor shoud be easy to setup and use. In the context of the Ruby ecosystem, this means having a way to automatically integrate with Rails and also have a default configuration that would work out of the box for most use cases.
Rails integration is important not only because it’s a good-to-have feature, but more because Rails has become a gold standard of Ruby web-development ecosystem. And since Workerholic’s core functionality revolves around web-applications, it does not make much sense to build it without complete Rails integration.
Like any other project, background job processors need to satisfy the needs of the majority of users. To achieve that, we needed to think about some sensible default configuration options. By doing so we allow users to focus on the needs of their web applications and not the tweaking of some arcane parameters.
To make it work out of the box, we pre-defined default options so you don’t need to supply anything we mentioned previously. By default, there will be 25 workers and the default number of Redis connections will be set to the number of workers + 3, in this case, 28. These three additional connections are required for the job scheduler, worker balancer, and the memory tracker components to function properly.
By default, Workerholic creates 1 process. If options[:processes] is defined, we fork the specified number of processes. Otherwise, we just start the manager for one process.
Since we don’t make any assumptions about the types of jobs your web application might have, Workerholic will use evenly balancing workers algorithm.
When Workerholic starts, it loads the main application’s source code in order to have access to the job classes. This way it can perform the jobs on the processing side. In case a Rails app is detected, it will load the Rails application codebase along with our own active job adapter.
Testing
As we were developing our features, we needed to test our code.
When building a background job processor, you need to test your code to make sure you do not introduce regressions by adding a feature or refactoring existing code.
For Workerhollic, we decided to have a testing environment separated from our development environment by setting a Redis DB on a different port. This way we don’t pollute our development database with testing samples.
What we found along the way was that testing threaded code is not trivial. We spent quite some time trying to figure out how to tame the async nature of threaded code. Having multiple threads running concurrently does not allow us to expect results immediately. Additionally, there is potential dependency on other threaded components, which add up to the overall complexity.
# spec/worker_spec.rbit'processes a job from a thread'doqueue=Workerholic::Queue.new(TEST_QUEUE)worker=Workerholic::Worker.new(queue)serialized_job=Workerholic::JobSerializer.serialize(job)redis.rpush(TEST_QUEUE,serialized_job)worker.workexpect_during(1,1){WorkerJobTest.check}end
In order to get around the asynchronous nature of threads, instead of asserting the final state of the system, we expect a certain state of the system to be mutated within a specified timeframe.
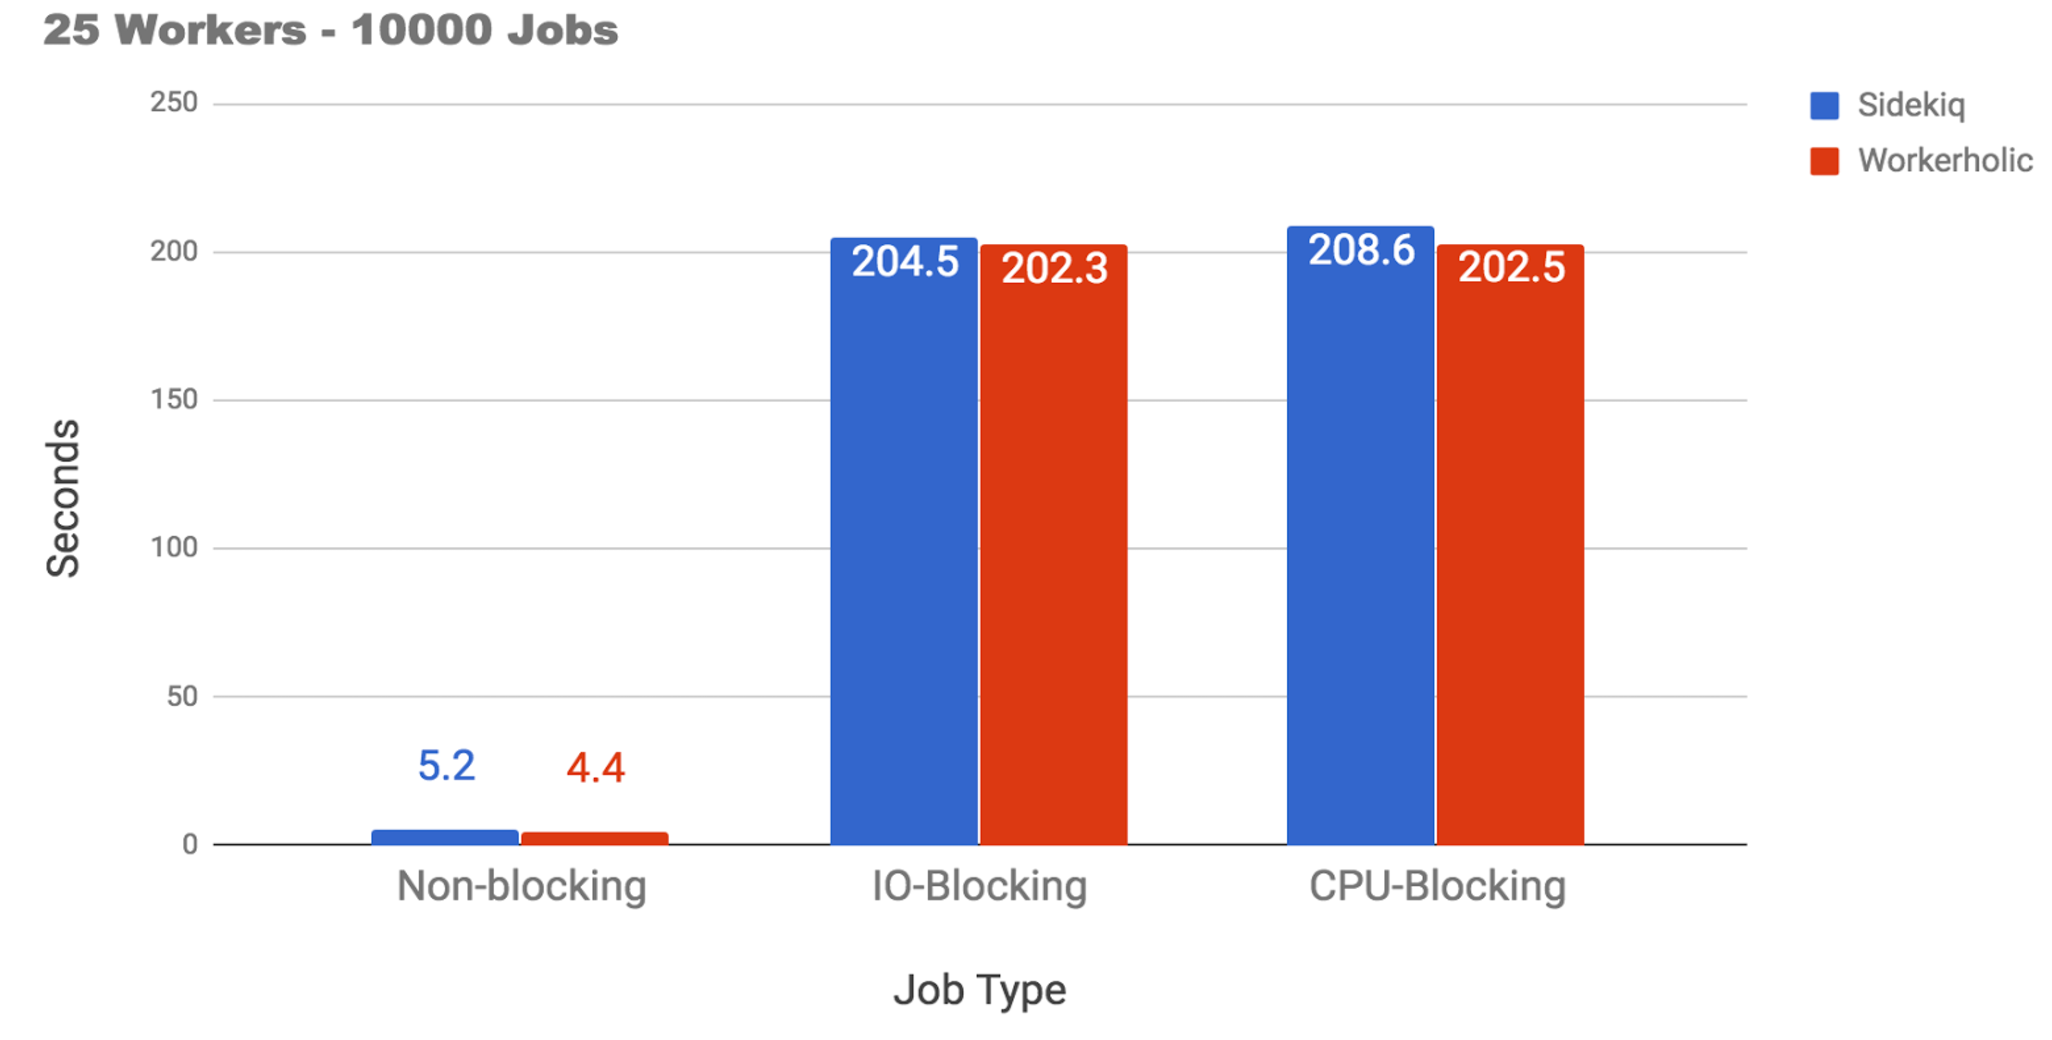
Workerholic compared to the Gold Standard: Sidekiq
Finally, we wanted to compare Workerholic with Sidekiq one last time with different types of jobs individually. We’re on par with Sidekiq, and only slightly faster than Sidekiq each time, and as we mentioned before this is because Sidekiq is a more mature and robust solution with a much larger feature-set.
As an additional feature, we wanted to make sure Workerholic runs on various Ruby interpeters and that’s why we chose JRuby (one of the most stable and mature Ruby interpreters) to be the main alternative interpreter. To ensure full compatibility, we ran an extensive set of jobs on our Rails application.
JRuby
We also decided to benchmark JRuby against MRI. Because JRuby can run multiple threads in parallel without the need of spinning up multiple processes, we found that execution of CPU blocking jobs was much faster in JRuby than in MRI using a single process, which is what we would expect.
Conclusion
It was a lot of fun to work on this project! Our goal was to share this knowledge with the community and we are confident our experience will be useful to other software engineers even if they don’t have a plan to build their own background job processor. After all, it’s usually a very interesting enterprise to understand how something works under the hood!
As a way to summarize, here are the main decisions that we made while building this project:
supporting concurrency by using threads
supporting parallel execution by using multiple processes
considering low level constructs such as threads and processes and their memory footprint
evaluating the impact on computational and memory resources when using multiple threads and multiple processes
using Redis as a key/value store and taking advantage of its awesome features such as native data structures, great performance and database snapshots
building a Ruby gem
providing users with an easy-to-use yet powerful CLI
working with JRuby
Since Workerholic is still in alpha, we do not recommend using it in a production environment. As for the next steps, we have quite a few in mind:
Automatically restart main Workerholic process in the event of failure (to improve reliability in case of emergency)
Establish more reliable and reactive jobs persistence methods (to lose even less jobs than we do at this moment if Redis crashes or if Workerholic crashes)
Identify other potential use-cases for Workerholic and adapt our codebase accordingly
We hope you enjoyed reading about our journey as much as we enjoyed the journey itself!